Thanks!
Do we lose the ability to edit posts after a certain time period?

Thanks!
Do we lose the ability to edit posts after a certain time period?
Yes, after a certain amount of time or if another post is posted after the one you want to edit.
1.0.0 Red Eyed Leaf/ Frog - Agalychnis callidryas
1.1.1 Bumblebee Dart Frog - Dendrobates leucomelas
1.1.0 Dendrobates truncatus - Yellow Striped
1.1.1 Dendrobates tinctorius – Bakhuis Mountain
1.1.0 - Dendrobates tinctorius - Powder Blue
1.1.0 - Ranitomeya vanzolinii
well crud, that's going to make things difficult
Hi Jason! I had been thinking about posting some photo tips as well, but had not got around to it (obviously!) so I think this is a terrific idea, and great work so far.
(As a small aside, I was wondering if the forum would have use for a photo sub section for equipment and technique discussions as well as a general area for gratuitous frog related photos? Your thread here would make a great first sticky. Just a thought, I don't know if it would be used enough.)
You solicited more advice, so I'll add my 2 cents worth:
1. Small table top tripods are also handy for confined areas around vivariums. If possible, test out your camera on a tripod to see if it's solid enough before you buy it.
When using a tripod and a long exposure- turn off your flash. The colour temperature of the flash and your vivarium lights are most likely not the same and you will end up with funky colour casts. This isn't necessarily bad, but worth noting (see attached pic- Hot&Cold for an example of mismatched lighting temperatures).
2. For macro focusing, lock the cameras focus then move the camera forward and back until the subject is in focus. If your camera has a manual focus setting, use it to set the focus near where you want, then move the camera forward and back to fine tune. If it only has auto focus, half press the shutter until it locks focus, then continue to half press the shutter while you move the camera forward and back until your subject is in focus. Practicing nailing the focus is well worth it as missed focus will make an enormous impact on picture quality.
3. An infrared or cable remote are good options as well. If using a DSLR/SLR, check your manual for something called "Mirror Lock-Up" (MLU), it's often integrated into the timer but you may need to enable it. This will cut down on vibrations/camera shake.
5. This depends on your point of view, but I think of it as perpendicular to the glass- the lens axis being the imaginary line that is perpendicular to the glass plane. At any rate, I agree to shoot 'head on' when possible (image attached). However this is *much* less important when there is air on the other side of the glass and not water (i.e. fish), so don't be shy about breaking this advice if needed.
Other glass shooting advice:
a. The closer the camera is to the glass, the less it will turn up.
b. The further away from the glass the frog is, the less in focus the glass will be.
c. Turn off your cameras built in flash when shooting head on at glass- it will reflect back and look icky.
d. Keep as much light off you and your camera as possible- you will turn up as reflections in the glass. Cover yourself with a black/dark sheet if necessary.
e. Build your vivarium with front opening doors so you don't have to worry about glass
6. In addition to taking lots of pictures- learn to delete the bad ones after you've figured out what's bad about them and how to improve!
7. Use reflectors. Typical vivarium lights come from directly above. Tape pieces of white paper all around your vivarium to bounce some light back from below. This will reflect light into the otherwise dark shadows. This isn't necessarily better depending on the look you are going for, but it is a cheap/free thing to experiment with. Cheap white pieces of paper work great as reflectors outside on wild frogs too.
8. I'll end with a compositional tip- animal portraits/pictures are often more engaging when taken at or near eye level. So give it a try, and definitely experiment with different shooting angles whatever you do. If photography isn't hard on your knees you aren't trying hard enough
Hope this is some help, keep up the good work
Yeah I'm actually going to cover quite a bit of your suggestions in the intermediate and advanced sections. Unfortunately I still need to take a few more pictures for illustration purposes before I can finish them.
I did mean to mention not using the flash in my beginner's tips though, drat. That's a good suggestion. And you're right, what I actually meant was shooting perpendicular to the glass
Intermediate Photography
In this section I'm going to cover the different functions at work every time you take a picture and how those functions affect each other. From here on out I'm going to assume that you have 1) a camera that allows you to manually adjust settings, and 2) aren't afraid to do a little reading. Bear with me, as this is somewhat complicated and difficult to explain.
We'll start with the basics. Every camera has a sensor that captures light and imprints it onto a photo. There are 3 main functions in every camera that control the amount of light that hits the sensor; shutter speed, aperture, and light sensitivity (ISO). I'll discuss each of them in detail.
Shutter Speed
We’ll start with the easy one, shutter speed. The shutter speed measures the time it takes for the shutter to open and close. Shutter speeds are measured as fractions of a second. So a shutter speed of 1/250 is much faster than 1/30. A faster shutter speed lets less light in, while a slower shutter speed lets more in. That’s all there is to it.
Aperture
The aperture on a camera controls the size of the shutter. The smaller you make the aperture, the less light is received by the sensor. It closes and opens based on a measurement known as an f-stop. The one thing you need to keep in mind about f-stops is that the higher the f-stop reading is, the smaller the aperture is.
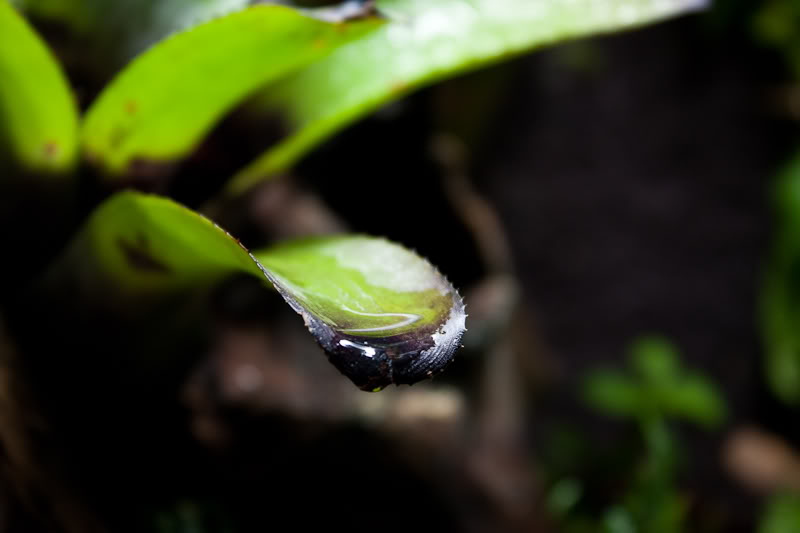
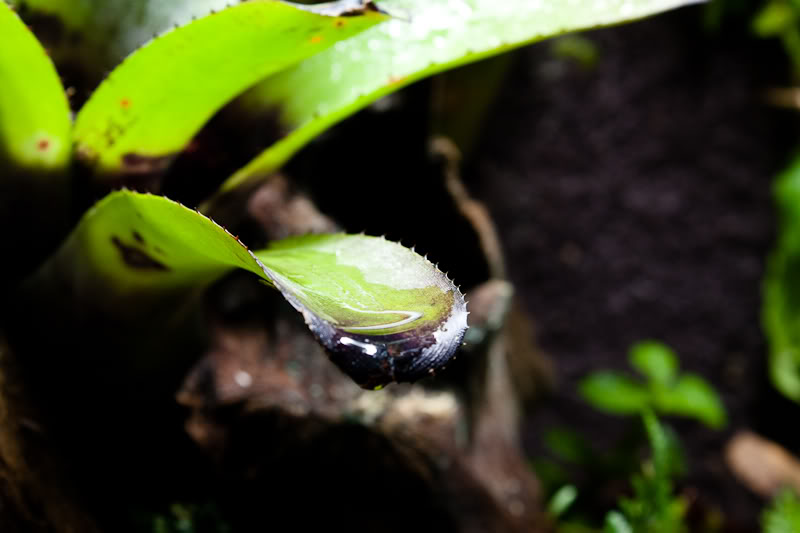
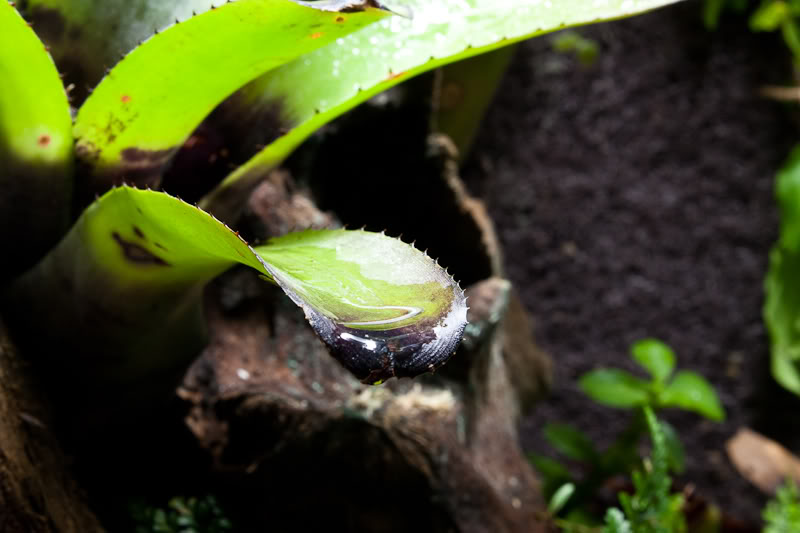
Now, the reason the aperture exists is to provide a depth of field. As you close down the aperture (remember, higher f-stop), you get a larger depth of field, which means that more of your picture will be in focus. You can think of the depth of field as a piece of paper. The thickness of the paper represents the area which will be in focus in the picture. The paper can intersect your subject at any point, but it will always be perpendicular to you. Does that make sense? As you close down the aperture (higher f-stop), the paper gets thicker, which results in more of the image being in focus. Seen below are 3 pictures of a bromeliad in my tank taken with the kit lens at 55mm. The first is taken at f/5.6, which is the largest aperture size my lens was capable of. As you can see very little of the picture is in focus, because the depth of field is very shallow. The second was taken at f/10, and the third was taken at f/16.
f/5.6
f/10
f/16
The depth of field changes based on your distance from the subject and the level of zoom your camera is using, so you'll need to experiment. The more you zoom in, the shallower your depth of field gets, and the closer you get to the subject, your depth of field will also become shallower. That's why those of you with macro lenses know how hard it is to get a usable depth of field
ISO (film speed)
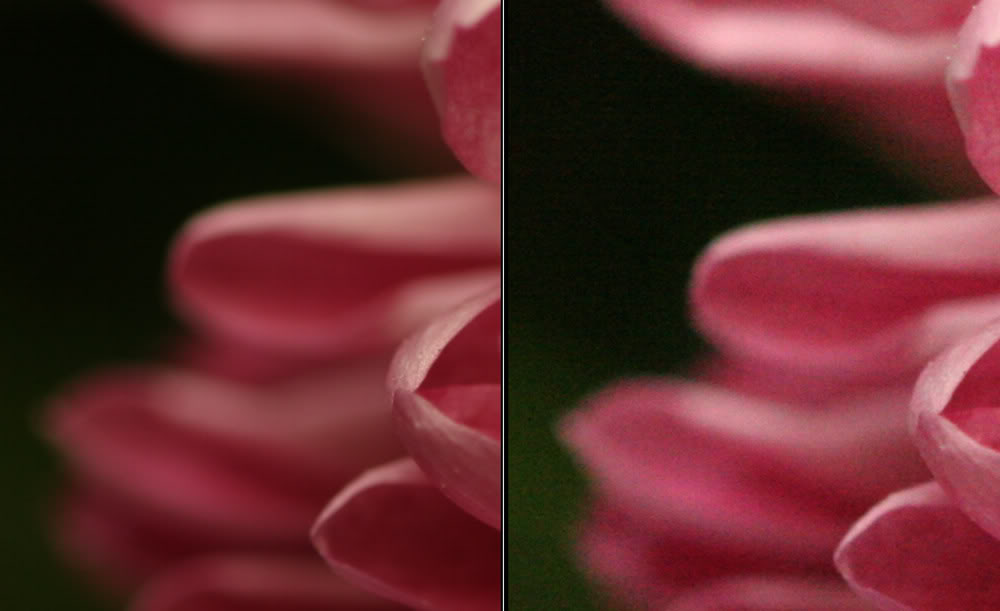
ISO measures the sensor's sensitivity to light. If you’ve ever used a film based camera you’ll remember this as film speed. It’s the same measurements here. ISO generally ranges from about 50 – 2,400 depending on your cameras capability. The lower the rating, the less sensitive the sensor is to light. The higher it is, the more sensitive, so the sensor needs less light to accurately expose a photograph. Theoretically speaking, a high ISO is always preferential because it allows you to shoot with less light available. The problem with using a high ISO is film grain. The higher the ISO setting you use, the more grain you introduce to each photograph, so you have to find a balance based on the amount of light available, and unfortunately there aren’t any rules of thumb set in stone as each camera has various amounts of grain introduced with each ISO setting.
Here's an example of a photograph comparing a low ISO (left) and a high ISO (right). Notice the extra amount of grain on the right. This image is not mine.
Now is where things get complicated. All 3 functions are inter-related. Changing one requires a change in the others. As you close down the aperture (remember, higher f-stop), less light is received by the camera’s sensor, which requires you to either slow down the shutter speed (increasing light received) or raise the ISO (making it so less light is necessary) in order to properly expose the photograph.
If you reduce the shutter speed (reducing light received by the sensor), you’ll need to either open the aperture more (allowing more light) or raise the ISO rating (making the sensor require less light). If you lower the shutter speed, the opposite is true.
I know this is very confusing and it really takes a while to wrap your head around all this information, but it really is crucial to understand and it's the first stepping stone to becoming a better photographer. Without knowing how your camera functions you're really just shooting in the dark. You can't understand why some of your pics turn out great and some don't.
Typically ISO is set as a constant based on your light available, so you really only have to worry about shutter speed and aperture. Luckily most cameras have advanced settings to help you take out some of the guesswork between them. They allow you to manually adjust one function and the camera then chooses the other in order to properly expose the picture. For Canon cameras the settings are TV (shutter speed priority) and AV (aperture priority). Refer to your camera's manual to figure out how to choose these settings.
For more detailed information, there are thousands of beginner photography guides on the internet that explain this, and you may find that reading those helps clear up anything I wasn't capable of explaining well.
Hi there, nice work again
Noise issues aside, sometimes it is desirable to have less sensitivity, for example when you want a long shutter to show the effects of movement (e.g. water fall in a vivarium-pretty ghetto pic attached but you can see the waters movement in the fountain part) and you don't want to stop down the lens any more (or can't) and you don't have or want to use ND filters.Originally Posted by VicSkimmr

It's also handy to have a lower ISO when balancing flash and sunlight for wild froggies. Lower sensitivity will also help you shoot at a wider aperture in full sunlight for an out of focus background, but this has never come up for me as an issue when photographing frogs or other small critters outside, except when balancing with a flash a being limited by the sync speeds.
All good points
I'm trying to keep my pointers specifically related to frogs and frog tanks, otherwise this thread would turn into a novel
The film/sensor is parallel to the glass though
There are currently 1 users browsing this thread. (0 members and 1 guests)
 Posting Permissions

 Reply With Quote


![[United States]](images/flags/United States.gif "United States")


![[Canada]](images/flags/Canada.gif "Canada")