Background looks great! I am not sure how I would hide the seams in the background. Might be able to get enough paint down in there to hide them some, but in all honesty once it is painted and planted you will be the only one who can se the seams in the background easily. Everyone else will look right past them
If it was my background I would probably be using either the foam coat from hotwire foam factory or unsanded tile grout colored with acrylic paint to do the base coat on the wall and then cover it in Drylock paint with various shades of tinting to it.
Short answer. there isn't really a wrong way to do it as long as you ensure the materials you use are nontoxic.
Paul
1.1.0 - Oophaga Pumilio 'Blue Jeans' (2014 Nicaragua Import)
1.1.0 - Oophaga Pumilio 'Chirique Grande' F1
1.1.0 - D. Tinctorius 'Citronella'
1.2.0 - D. Tinctorius 'Azureus'
0.0.2 - D. Tinctorius 'Sipaliwini'
0.0.2 - D. Tinctorius 'New River'
0.0.4 - D. Tinctorius 'Leucomelas'
0.0.4 - Terribilis 'Mint'
1.1.0 - R. Ventrimaculatus 'French Guiana'
Facebook - https://www.facebook.com/hashtagfrogs
Youtube - https://www.youtube.com/channel/UCgC...sEZiZQoT8sOuuw


![[United States]](images/flags/United States.gif "United States")
sticking long fiber sphagnum moss between cracks or over bare spots in paint is a popular method.
Life is a journey, not a destination. -Ralph Waldo Emerson
Thank guysI will probably end up going with the nontoxic acrylic paint with Krylon over it just because it's cheap, I can get it locally, and most importantly it is the least intimidating option lol! Everything else sounds so complicated and scary for a first time background painter
Good idea to use the moss. I should have extras.
Any tips on finding non toxic acrylic paint For Walmart to mix up for me? Is there a certain brand that is non toxic?
Okay. I found non toxic acrylic paint. Got the three panels 90% done...should I use peat moss or sphagnum moss to "decorate" it? Does it go on before or after the final Krylon coat? I assume after. What do I put it on there with...hot glue? I have no idea
Pictures will come tomorrow
Originally Posted by BCollie

You could get some live sheet moss to decorate the back wall with. Moss can be pinned to the background using floral wire, zip ties, hot glue, super glue, epoxy, tooth picks ... anything really as long as when it dries it is non toxic. If you are using live moss than the mounting method could be done in a way so it can be removed in a few months when the moss has attached itself to the background.
1.1.0 - Oophaga Pumilio 'Blue Jeans' (2014 Nicaragua Import)
1.1.0 - Oophaga Pumilio 'Chirique Grande' F1
1.1.0 - D. Tinctorius 'Citronella'
1.2.0 - D. Tinctorius 'Azureus'
0.0.2 - D. Tinctorius 'Sipaliwini'
0.0.2 - D. Tinctorius 'New River'
0.0.4 - D. Tinctorius 'Leucomelas'
0.0.4 - Terribilis 'Mint'
1.1.0 - R. Ventrimaculatus 'French Guiana'
Facebook - https://www.facebook.com/hashtagfrogs
Youtube - https://www.youtube.com/channel/UCgC...sEZiZQoT8sOuuw
Oh, hmm...to use live moss or not to use live moss? That's going to be a hard decision. Peat or Sphagnum would be cheaper but may look too dead
Would I be able to find sheet moss at a local store or would I most likely need to special order it?
Check your local nursery for it.
I called all my local nurseries between classes and one has sheet moss, but not LIVE sheet moss. I'm going to stop by and look at it since it's on my way home, we'll see if I like it enough to use it...also depends on how expensive it is!
Oh, quick question before my next class starts...are there any plants that could be stuck to the background? NOT mosses, but leafy(fine or thick leaves, doesn't matter) plants? If this is possible what plants would be best for it?
That would be Broms.
do you wanna check josh frogs, neherp, etc and get smth shipped.... Moss, Broms, etc
Save one animal and it doesn't change the world, but it surely changes the world for that one animal!
Tillandsias are great for backgrounds too (type of brom?). There are also epiphytic (air plants) vines and ferns.
Life is a journey, not a destination. -Ralph Waldo Emerson
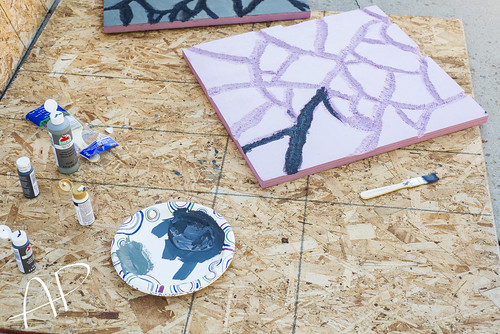
So far, I have spent 12!! hours on these 3 pieces - turned them from foam blocks into works of art.
Beginning...the start of painting.
Learned after finishing this piece...
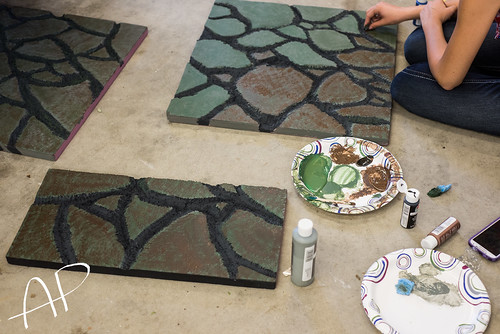
That it was better to paint the crevices first, THEN the rocks. So I did
Finished painting the basics, so I started adding details. A layer of green, then a layer of brown, then another layer of green, then a layer of "rock" color with sponges.
By the time it was done, my opinion is that is was downright beautiful, for having been created by me. This was my first time ever painting something, I poured all my creative talent into it. At this point, I'd spent 12 hours on it and I was pretty dang pleased with myself. Time well spent.
Time to break out the Krylon to make it waterproof.
I sprayed the first coat, paying special attention to the crevices. You would imagine my surprise when I saw pink show up.
I had an idea, so I went inside and got a little piece of foam to try something.
Yep, just as I suspected. KRYLON EATS ANY LITTLE PIECE OF FOAM NOT 100% COVERED BY PAINT.
Did I seriously just waste 12 hours on this? Is there nothing I can do now? I am furious, and sad, I want to hit things and cry.
It looks great!!
Dont worry these things happen to all of us. You have 3 options.
1. Throw it away and start over <not a serious option>
2. touch up the paint and then re apply the Krylon
3. Leave as is and hide it with moss.
Check Heherp for live moss. I use the moss they sale as "NeHerp Moss" all the time and I love it. You can either get a small ziplock bag full or a large 12x12 back full. The bigger back is $15 and the smaller one is $9 i think. You get a TON of it in those bags though. For pinning to the background in places I would do the smaller bag
1.1.0 - Oophaga Pumilio 'Blue Jeans' (2014 Nicaragua Import)
1.1.0 - Oophaga Pumilio 'Chirique Grande' F1
1.1.0 - D. Tinctorius 'Citronella'
1.2.0 - D. Tinctorius 'Azureus'
0.0.2 - D. Tinctorius 'Sipaliwini'
0.0.2 - D. Tinctorius 'New River'
0.0.4 - D. Tinctorius 'Leucomelas'
0.0.4 - Terribilis 'Mint'
1.1.0 - R. Ventrimaculatus 'French Guiana'
Facebook - https://www.facebook.com/hashtagfrogs
Youtube - https://www.youtube.com/channel/UCgC...sEZiZQoT8sOuuw
Tonight cannot get any worse. Seriously, come on life, BRING IT ON. First my foam starts melting, then I go inside to check on a chick I had to help hatch because it was malpositioned in the egg(only to find it had unabsorbed yolk, so it got stuck in a cup inside the incubator so it could absorb the yolk) to find it had died, and then my heat lamp for the chicks brooder went out. My mom asked why I was being so grumpy and I just broke down crying.
$10 from my vivarium budget is now going towards buying a new bulb for the stupid heat lamp.
If the foam melts much more, I'm afraid it will melt all the way through. It's about 3/4 of the way through the board from a combination of me scraping it down & then the Krylon eating away at it. I've done two coats of Krylon.
1. Will 3 light coats of Krylon be enough to make the board waterproof?
2. Can I do the 3rd coat of Krylon then touch it up with acrylic paint mixed with Titebond 3? That way I don't risk the Krylon finding another invisible crack and eating more foam?
3. Is the foam itself waterproof? Will it disintegrate in the water at all or make the water unsafe? Or is it totally safe to be submerged in water?(I'm thinking about the bottom of it in the drainage layer.
I will look into live moss but I'm not sure I can afford it now, depending on how much shipping is. I'm ready to have this background done, I may just end up sticking on dead Sphagnum or Peat moss then buying live moss when I can afford it. I do like the idea of a live moss background.
**marks new expenses
EXPENSES as of Oct 5th/6th, 2014
**Non-toxic acrylic paint and paint brushes, $7
**Clear, Matte Finish Krylon Spray Paint, $5
Fiberglass window screen $5
1.5cf river pebbles $15
Three 2x2 foam panels $16
Low Temp Hot glue gun&glue: $8
Quilt Batting: $8
Walmart razor blades for scraping glass clean: $5
Soil mixture(Orchid Bark, Sphagnum Moss, Peat Moss, Charcoal, Fir Bark): $74
Plants: $13
Total spent so far: $156
Remaining: $38
EXPENSES as of Oct 4th, 2014
Fiberglass window screen $5
1.5cf river pebbles $15
Three 2x2 foam panels $16
Low Temp Hot glue gun&glue: $8
Quilt Batting: $8
Walmart razor blades for scraping glass clean: $5
Soil mixture(Orchid Bark, Sphagnum Moss, Peat Moss, Charcoal, Fir Bark): $74
Plants: $13
Total spent so far: $144
Remaining: $50
EXPENSES as of Oct 3rd, 2014:
Starting budget: $167
Walmart razor blades for scraping glass clean: $5
Soil mixture(Orchid Bark, Sphagnum Moss, Peat Moss, Charcoal, Fir Bark): $74
Plants: $13
Total spent so far: $92
Remaining: $75
Be careful. Getting frustrated and seemingly rushing to move past the pain will result in more pain always.
You will need to come at this from a different angle. The back and sides will need to be sprayed with the krylon and we now know that will dissolve your awesome back ground into nothingness.
Here is what I would do if I woke up in your situation. Take the Krylon back to where you bought it and tell them it is the wrong product and you made a mistake. Most places have excellent return policies. Then buy some paint on polyurethane (its the chemicals in the aerosol that are melting the foam). Go home and touch up the affected areas. Redo the hole thing if you have to, but don't rush. These things take time and mistakes happen. I cant even begin to tell you how many times I spent hours and hours on something for a tank just to have it fail. You just have to walk away regroup and come back recharged and fresh with the new knowledge you just gained seared into your brain. anyways... Touch it up and then do 3 coats of the Poly. You will want to do all 4 sides since the whole thing will be in the tank and not just the front. 3 really good coats. The first coat will get mostly absorbed and then the other 2 should cover it. Allow each coat to dry for the recommended amount of time on the product you buy.
Please dont rush. You will only end up costing yourself more money.
1.1.0 - Oophaga Pumilio 'Blue Jeans' (2014 Nicaragua Import)
1.1.0 - Oophaga Pumilio 'Chirique Grande' F1
1.1.0 - D. Tinctorius 'Citronella'
1.2.0 - D. Tinctorius 'Azureus'
0.0.2 - D. Tinctorius 'Sipaliwini'
0.0.2 - D. Tinctorius 'New River'
0.0.4 - D. Tinctorius 'Leucomelas'
0.0.4 - Terribilis 'Mint'
1.1.0 - R. Ventrimaculatus 'French Guiana'
Facebook - https://www.facebook.com/hashtagfrogs
Youtube - https://www.youtube.com/channel/UCgC...sEZiZQoT8sOuuw
Yeah.... Paul is so right.... Learned the same hard way. Don't rush! And try to make this best of the situation.
Save one animal and it doesn't change the world, but it surely changes the world for that one animal!
Thank you. I think I just need to calm down before I work on it again. I'm very upset over a horrible hatch. I set 23 chicken eggs in my incubator. 13 made it to "lockdown" which is where you stop turning the eggs and prepare for them to hatch. Of those 13, 5 hatched and 1 died. This is the worst hatch I've ever had, and it's especially heartbreaking because I was planning on keeping some of these chicks. I'm happy for the 4 healthy ones I have, but heartbroken over such a horrible hatch.The foam melting was just the icing on the cake.
I will reread your message to figure out exactly what needs to be done TOMORROW. Right now, I'm going to bed.
Here's a picture of my dog and one of my baby chicks.


Many solvents melt polystyrene products. It's actually how harder molded plastics are made.
ie these foams will completely melt if exposed to any kind of acetone.
I wish I could offer additional advice as to how to re-group but I have zero experience in this department.
You are very artistic. Have you considered simply painting the outside of the glass?

Current Collection
Dendrobates leucomelas - standard morph
Dendrobates auratus Costa Rican Green Black"
Dendrobates auratus "Pena Blanca"
Dendrobates tinctorius New River
Dendrobates tinctorius "Green Sipaliwini"
Dendrobates tinctorius Powder Blue"
Dendrobates tinctorius "French Guiana Dwarf Cobalt"
Phyllobates terribilis Mint
Phyllobates terribilis "Orange"
Phyllobates bicolor "Uraba"
Oophaga pumilio "Black Jeans"
Oophaga pumilio "Isla Popa"
Oophaga pumilio "Bastimentos"
Oophaga pumilio Mimbitimbi
Oophaga pumilio "Rio Colubre"
Oophaga pumilio "Red Frog Beach
Oophaga pumilio "Rio Branco"
Oophaga pumilio Valle del Rey
Oophaga pumilio "BriBri"
Oophaga pumilio "El Dorado"
Oophaga pumilio "Cristobal"
Oophaga pumilio "Rambala"
Oophaga Vicentei (blue)
Oophaga sylvatica "Paru"
Oophaga sylvatica "Pata Blanca"
Oophaga histrionica Redhead
Oophaga histrionica "Blue"
Oophaga lehmanni "Red"
Oophaga histrionica "Tado"
Ranitomeya variabilis "Southern"
Ranitomeya imitator "Varadero"
Ranitomeya sirensis "Lower Ucayali"
Ranitomeya vanzolinii
http://www.fernsfrogs.com
https://www.facebook.com/ferns.frogs
There are currently 1 users browsing this thread. (0 members and 1 guests)
 Posting Permissions


 Reply With Quote

![[Canada]](images/flags/Canada.gif "Canada")