Water was added to the tank. I filled it up to just below the hole I drilled in the tank which is 1.5 " higher than where the water level max should be. It has been sitting with water in it for 12 hours and no leaks!!! I will let it continue to sit until Monday Morning. If there are still no leaks it will be drained and the build will continue!
1.1.0 - Oophaga Pumilio 'Blue Jeans' (2014 Nicaragua Import)
1.1.0 - Oophaga Pumilio 'Chirique Grande' F1
1.1.0 - D. Tinctorius 'Citronella'
1.2.0 - D. Tinctorius 'Azureus'
0.0.2 - D. Tinctorius 'Sipaliwini'
0.0.2 - D. Tinctorius 'New River'
0.0.4 - D. Tinctorius 'Leucomelas'
0.0.4 - Terribilis 'Mint'
1.1.0 - R. Ventrimaculatus 'French Guiana'
Facebook - https://www.facebook.com/hashtagfrogs
Youtube - https://www.youtube.com/channel/UCgC...sEZiZQoT8sOuuw
I am considering eliminating the aquatic section for this tank. All my tanks currently are heated using an aquatic heater. What are some other ways to heat a Dart tank with a full glass top?
1.1.0 - Oophaga Pumilio 'Blue Jeans' (2014 Nicaragua Import)
1.1.0 - Oophaga Pumilio 'Chirique Grande' F1
1.1.0 - D. Tinctorius 'Citronella'
1.2.0 - D. Tinctorius 'Azureus'
0.0.2 - D. Tinctorius 'Sipaliwini'
0.0.2 - D. Tinctorius 'New River'
0.0.4 - D. Tinctorius 'Leucomelas'
0.0.4 - Terribilis 'Mint'
1.1.0 - R. Ventrimaculatus 'French Guiana'
Facebook - https://www.facebook.com/hashtagfrogs
Youtube - https://www.youtube.com/channel/UCgC...sEZiZQoT8sOuuw
Ok The aquatic section stays. My mini meltdown over it was quickly squashed. When i say quickly I mean I sat in front of the empty tank covered in spray foam and changed the false bottom layout 10 - 15 times while thinking about how each change would effect the tank. I "think" i have decided to eliminate the t separate slopes into the water. At present I have the front edge of the whole false bottom sloped, but much more sharply than before. No Pictures of it right now, I am not sure this is how it will stay.
I have some concerns about how arboreal the Cits will be and if they will even climb up to the 2nd land mass. This thought has me concerned and I am anxious to get them in the QT tank so I can watch them and see how much they climb or how willing they are to climb. I am considering a solution for this and may end up laying it out to see how I like it prior to making a final decision. I really do like the elevated land section. I just need to make sure they can access it readily.
I am also considering doing a DIY fogger for this tank. Though again I am not 100% sure. It is nice having the QT tank up and running so I don't feel rushed to put "something" together for them to move into.
I Love this phase of the build!
1.1.0 - Oophaga Pumilio 'Blue Jeans' (2014 Nicaragua Import)
1.1.0 - Oophaga Pumilio 'Chirique Grande' F1
1.1.0 - D. Tinctorius 'Citronella'
1.2.0 - D. Tinctorius 'Azureus'
0.0.2 - D. Tinctorius 'Sipaliwini'
0.0.2 - D. Tinctorius 'New River'
0.0.4 - D. Tinctorius 'Leucomelas'
0.0.4 - Terribilis 'Mint'
1.1.0 - R. Ventrimaculatus 'French Guiana'
Facebook - https://www.facebook.com/hashtagfrogs
Youtube - https://www.youtube.com/channel/UCgC...sEZiZQoT8sOuuw
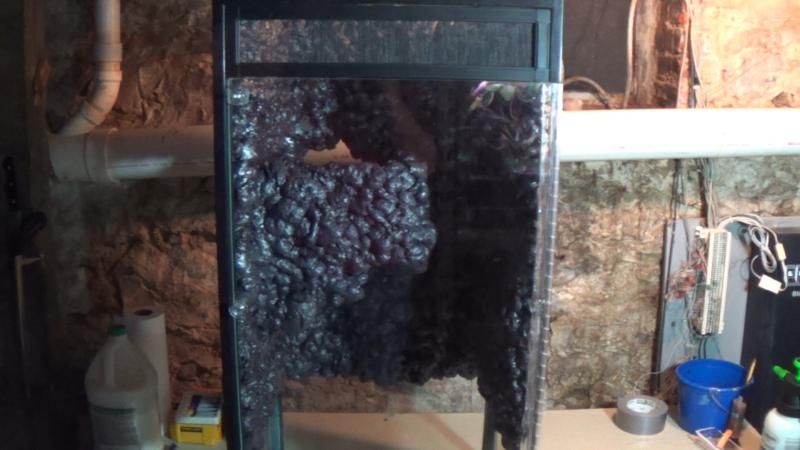
Here is the tank with the foam applied. After looking at it for 2 days while I waited for the water test to be done I decided I didn't like having all 3 sides foamed...
So I removed the foam from the right wall and Love what that one change did to the look of the tank so far.
I will need to do a tiny bit of foaming down the corner I cut, but for the next day or 2 the first coat of slurry will be drying. The water test passed with flying colors! More updates once the slurry dries and I am able to fix the foam in the corned.
1.1.0 - Oophaga Pumilio 'Blue Jeans' (2014 Nicaragua Import)
1.1.0 - Oophaga Pumilio 'Chirique Grande' F1
1.1.0 - D. Tinctorius 'Citronella'
1.2.0 - D. Tinctorius 'Azureus'
0.0.2 - D. Tinctorius 'Sipaliwini'
0.0.2 - D. Tinctorius 'New River'
0.0.4 - D. Tinctorius 'Leucomelas'
0.0.4 - Terribilis 'Mint'
1.1.0 - R. Ventrimaculatus 'French Guiana'
Facebook - https://www.facebook.com/hashtagfrogs
Youtube - https://www.youtube.com/channel/UCgC...sEZiZQoT8sOuuw
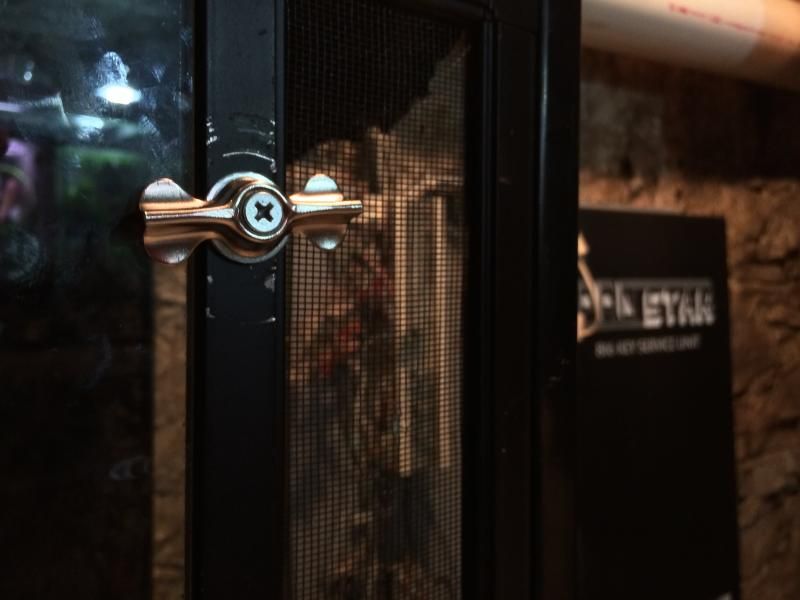
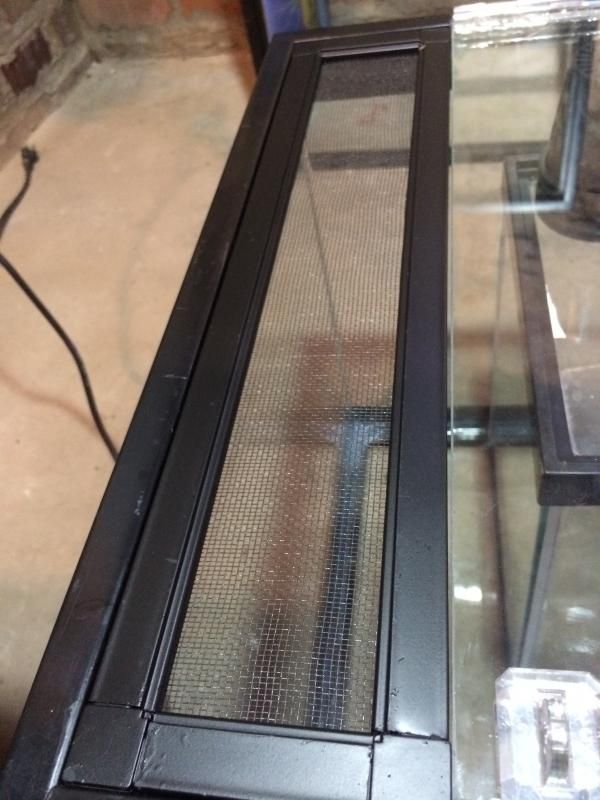
I was able to do one thing today. The Latches were not working as I had pictured so they were removed from the tank today. I went to Home Depot and got a full turn button (they are used for screen repairs and locking). I attached it to the bottom of the screen. Since the door opens left to right I put it on the left side. It is going to work perfect.
it ruffed up the paint at first as you can tell. I added a washer under it to raise it up slightly.
1.1.0 - Oophaga Pumilio 'Blue Jeans' (2014 Nicaragua Import)
1.1.0 - Oophaga Pumilio 'Chirique Grande' F1
1.1.0 - D. Tinctorius 'Citronella'
1.2.0 - D. Tinctorius 'Azureus'
0.0.2 - D. Tinctorius 'Sipaliwini'
0.0.2 - D. Tinctorius 'New River'
0.0.4 - D. Tinctorius 'Leucomelas'
0.0.4 - Terribilis 'Mint'
1.1.0 - R. Ventrimaculatus 'French Guiana'
Facebook - https://www.facebook.com/hashtagfrogs
Youtube - https://www.youtube.com/channel/UCgC...sEZiZQoT8sOuuw
Part 3 of the video journal is now on youtube. I did much more editing on this part to reduce the overall length of the video drastically. If you watch it and Part 1 and 2. Let me know if you prefer the shorted version or the longer version. Or any other criticisms you may have
https://www.youtube.com/watch?v=hfdNCpr0GhQ
1.1.0 - Oophaga Pumilio 'Blue Jeans' (2014 Nicaragua Import)
1.1.0 - Oophaga Pumilio 'Chirique Grande' F1
1.1.0 - D. Tinctorius 'Citronella'
1.2.0 - D. Tinctorius 'Azureus'
0.0.2 - D. Tinctorius 'Sipaliwini'
0.0.2 - D. Tinctorius 'New River'
0.0.4 - D. Tinctorius 'Leucomelas'
0.0.4 - Terribilis 'Mint'
1.1.0 - R. Ventrimaculatus 'French Guiana'
Facebook - https://www.facebook.com/hashtagfrogs
Youtube - https://www.youtube.com/channel/UCgC...sEZiZQoT8sOuuw


![[United States]](images/flags/United States.gif "United States")
Paul,
These videos are great!
They have all been posted to Frog Forum Facebook.
Personally........
As mentioned, I don't think parts 1 and 2 were too long.
Keep in mind , I have NEVER built an enclosure with a false bottom. (I layer and drill for drainage)
They are easy to follow....especially for someone that has never done attempted it

Last edited by flybyferns; July 22nd, 2014 at 07:22 AM.
Current Collection
Dendrobates leucomelas - standard morph
Dendrobates auratus “Costa Rican Green Black"
Dendrobates auratus "Pena Blanca"
Dendrobates tinctorius “New River”
Dendrobates tinctorius "Green Sipaliwini"
Dendrobates tinctorius “Powder Blue"
Dendrobates tinctorius "French Guiana Dwarf Cobalt"
Phyllobates terribilis “Mint”
Phyllobates terribilis "Orange"
Phyllobates bicolor "Uraba"
Oophaga pumilio "Black Jeans"
Oophaga pumilio "Isla Popa"
Oophaga pumilio "Bastimentos"
Oophaga pumilio “Mimbitimbi”
Oophaga pumilio "Rio Colubre"
Oophaga pumilio "Red Frog Beach”
Oophaga pumilio "Rio Branco"
Oophaga pumilio “Valle del Rey”
Oophaga pumilio "BriBri"
Oophaga pumilio "El Dorado"
Oophaga pumilio "Cristobal"
Oophaga pumilio "Rambala"
Oophaga “Vicentei” (blue)
Oophaga sylvatica "Paru"
Oophaga sylvatica "Pata Blanca"
Oophaga histrionica “Redhead”
Oophaga histrionica "Blue"
Oophaga lehmanni "Red"
Oophaga histrionica "Tado"
Ranitomeya variabilis "Southern"
Ranitomeya imitator "Varadero"
Ranitomeya sirensis "Lower Ucayali"
Ranitomeya vanzolinii
http://www.fernsfrogs.com
https://www.facebook.com/ferns.frogs
~~~~~Repost from how to thread --- Merging the 2 threads together~~~~~
HOW TO: Convert a 40B into a Vertical Tank
In this guide I will show you how to turn a 40B tank into this (false bottom layout not included)
Click here to view the original image of 600x800px.
A 40B tank is 36" Long x 18" Deep x 16" Tall. The vertical version will be 18" Long x 16" Deep x 36" Tall
Note: My 40B tank was not square - One side of the tank was 1/8" longer than the other, this made things a bit tricky, but with a little bit of magic it can work. I am not sure if this is a design flaw with 40B or if I was lucky. I fixed this by putting my door glass on just a tiny bit crooked to make it seem less off and then fixed the rest of the out of square with my vent. I just made one side of the vent narrower than the other. If you look in the above picture you might be able to notice.
Video Guide:
I put together a short 4:30 video guide for how I converted my 40B to a vertical tank.
Video - https://www.youtube.com/watch?v=hacPfNycr0M
Written Guide:
Step 1 - Decide How tall you want your door to be. For this guide I did a 24" tall door (roughly 61CM)
Step 2 - Decide how tall you want the glass at the bottom of the tank to be. This section will be made water tight to accommodate a false bottom/Drainage Layer/ Aquatic section. For this guide my water tight section will be 7" (17.78cm)
Step 3 - Decide what side of the tank you want the door hinges to be on. Now measure out and mark the top and bottom of your door. The bottom of the door will be just above the glass section for our Water tight area.
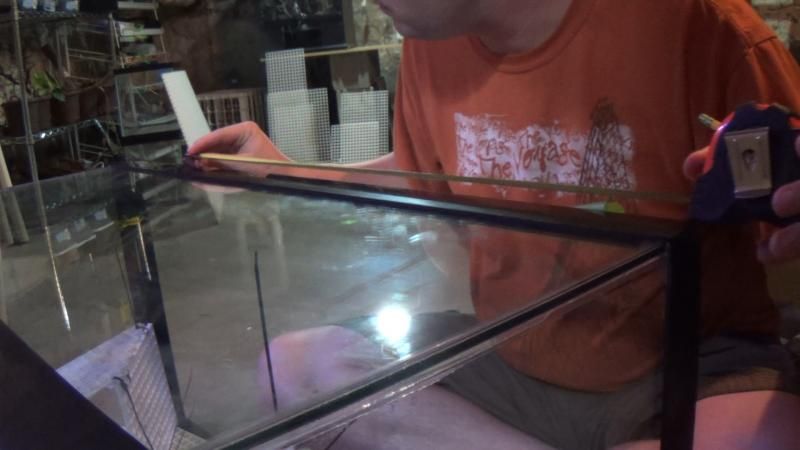
Step 4 - Measure out the Water tight area and mark it on the side of the tank (on the tank plastic rim). Measure out and mark the door height (Start from the water tight mark and measure up) Double and triple check all measurements
Click here to view the original image of 800x450px.
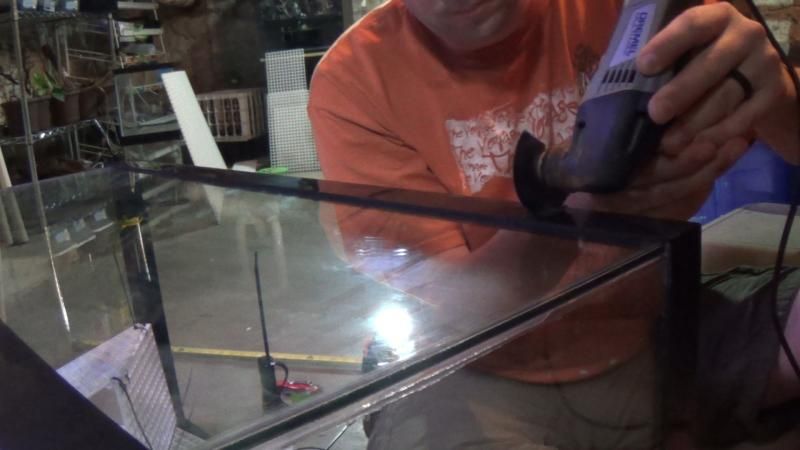
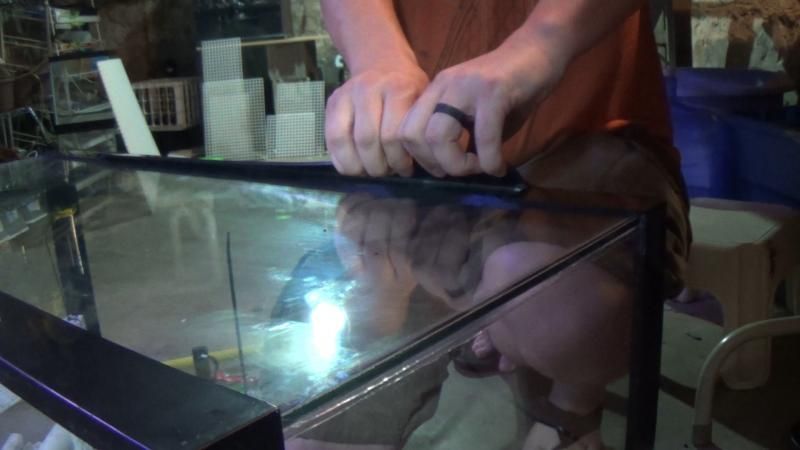
Step 5 - Cut the Plastic frame at both marks (I used a dremel tool) be careful not to cut the glass.
Click here to view the original image of 800x450px.
Step 6 - Remove the frame section between the 2 cuts. It is attached using silicone so you will have to muscle it off the tank. Be careful not to break the glass in your anger
Click here to view the original image of 800x450px.
Step 7 - Scrape and clean all the residual silicone off the now exposed tank glass. I used a razor blade to scrape off the silicone and then an alcohol based cleaned to clean the glass
Step 8 - Test fit your hinges. If you need to trim more of the frame off now is the time to do it. Repeat steps 6 and 7 after trimming is complete
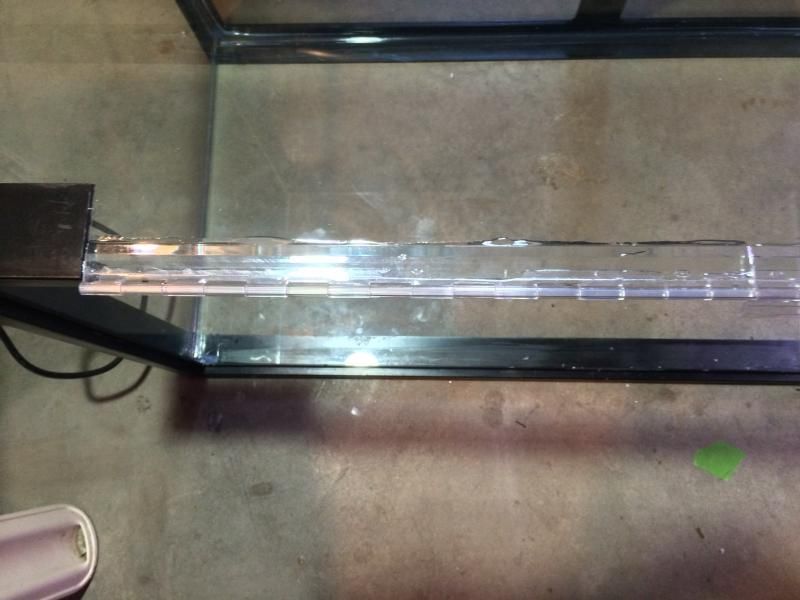
Step 9 - Apply your 2 part epoxy to the back of one hinge and put it in place. (I left the 2nd hinge on the tank to make sure the one being glued was in the correct location). Hold the hinge in place for a couple mins until the epoxy begins to harden. Once the first hinge is secure repeat this step for the 2nd hinge. (The epoxy will need 24 hours to cure before the door can be attached so lets move on to another section while we wait)
Click here to view the original image of 800x600px.
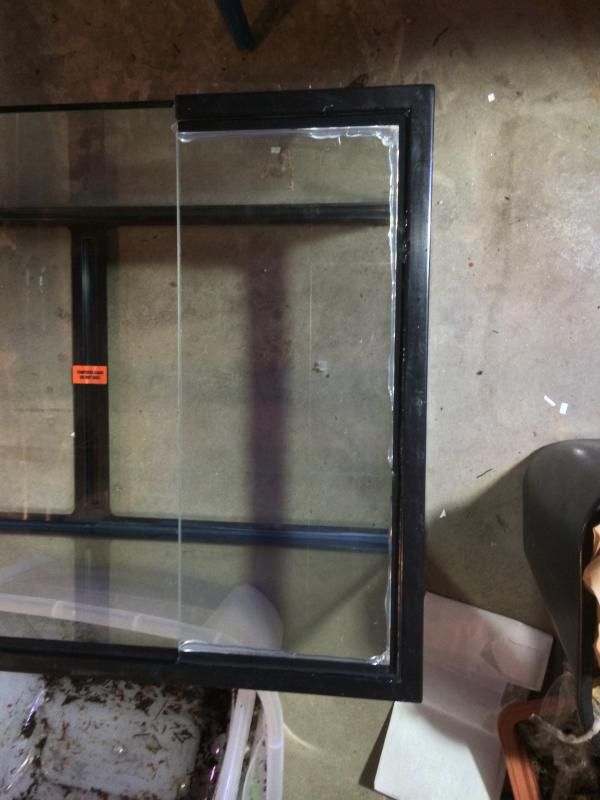
Step 10 - Test fit the glass for the water tight section. Make sure it is just barely short of the hinges from the previous section. Once you are sure it fits remove the glass. rough up the aquarium plastic frame lip with sand paper and then wipe it clean. Apply a generous bead of silicone (More is always better than to little) and press glass firmly into place. Put something heavy on the glass while the silicone cures. This will also take 24 hours. We need the door in place before we can do anything else. So we wait
Click here to view the original image of 600x800px.
24 Hours later
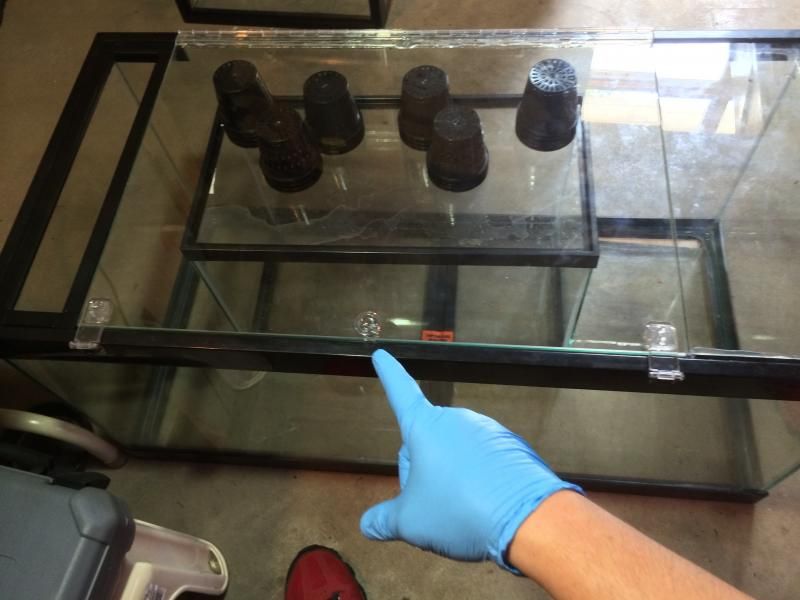
Step 11 - You will need to get creative here - You need to support the glass for the door on the side by the hinges (remember we just cut the plastic frame away so the lip the glass would sit on is now in the garbage). Make sure it is level with the tank opening (or as level as you can get).
Step 12 - Time to epoxy the hinges. Do one hinge at a time. Apply the epoxy to the hinge, press into place and hold for a few mins until epoxy begins to harden. Repeat for 2nd hinge. I also epoxied the hardware for the door at this time. The epoxy will need to cure for 24 hours before the tank can be moved, but we can get the vent done while we wait.
Click here to view the original image of 800x600px.
Step 13 - My Screen kit required me to subtract 1 1/2" from each measurement to allow for the corner pieces of the kit. You will be cutting 4 pieces of screen frame. I measured the bottom and one side then cut and fit this together. I then test fit them on the tank and then cut the top. Test fit it with the other pieces on the tank and then cut the remaining side.
Step 14 - Optional: I painted my screen frame. My local store did not have a black frame available so I bought silver and then spray painted it black to match the tank frame.
Step 15 - Measure out some fiberglass screening (you want it to be about 1" or more longer on all sides)
Step 16 - Lay screen over the frame and install the screen.
Step 17 - Temp install the completed vent section using tape to hold it in place. You want to test opening and closing the door to make sure your frame isn't rubbing to much or getting in the way before we secure it in place permanently.
Click here to view the original image of 600x800px.
Wait 24 Hours for Door and hinge epoxy to cure
Step 18 - Test opening and closing the door. If the vent is clear than remove the tape and vent. Apply a thin bead of silicone (this does not need to be water tight) to the tank frame and press the vent into place. Let cure for 24 hours
Step 19 - Optional: I drilled a hole in my tanks water section up near the top of the 7" I allotted to allow me to route any air lines or power cords out of the tank without needing to run them up the entire 36"
--------------------- End Guide ---------------------
Material List and where I got them from
Hardware Store
2 Part Clear Epoxy
Rubber Gloves
Screen Frame Kit
Fiber Glass Screen
100% silicone
Joshs Frogs
Acrylic Piano hinges
Acrylic Hasp
Acrylic Knob
Local Glass Company
Glass cut to size for door
Glass cut to size for lower section
---- End Material List ----
Hope this helps anyone who is interested in covering a standard aquarium to a vertical tank. Thanks for reading / Watching
Paul
1.1.0 - Oophaga Pumilio 'Blue Jeans' (2014 Nicaragua Import)
1.1.0 - Oophaga Pumilio 'Chirique Grande' F1
1.1.0 - D. Tinctorius 'Citronella'
1.2.0 - D. Tinctorius 'Azureus'
0.0.2 - D. Tinctorius 'Sipaliwini'
0.0.2 - D. Tinctorius 'New River'
0.0.4 - D. Tinctorius 'Leucomelas'
0.0.4 - Terribilis 'Mint'
1.1.0 - R. Ventrimaculatus 'French Guiana'
Facebook - https://www.facebook.com/hashtagfrogs
Youtube - https://www.youtube.com/channel/UCgC...sEZiZQoT8sOuuw
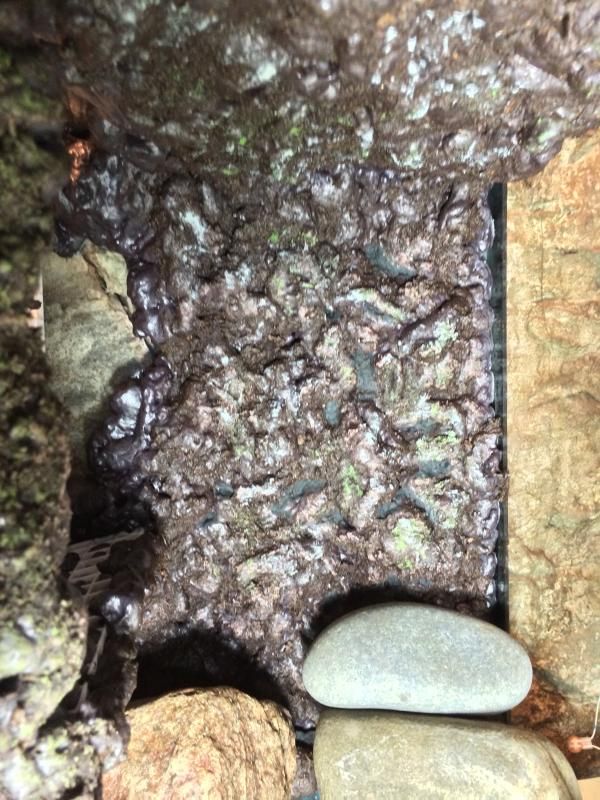
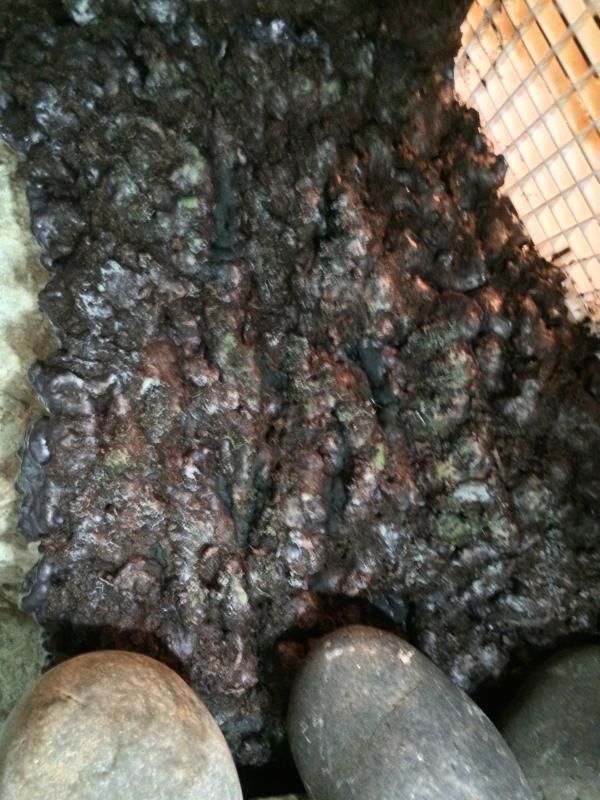
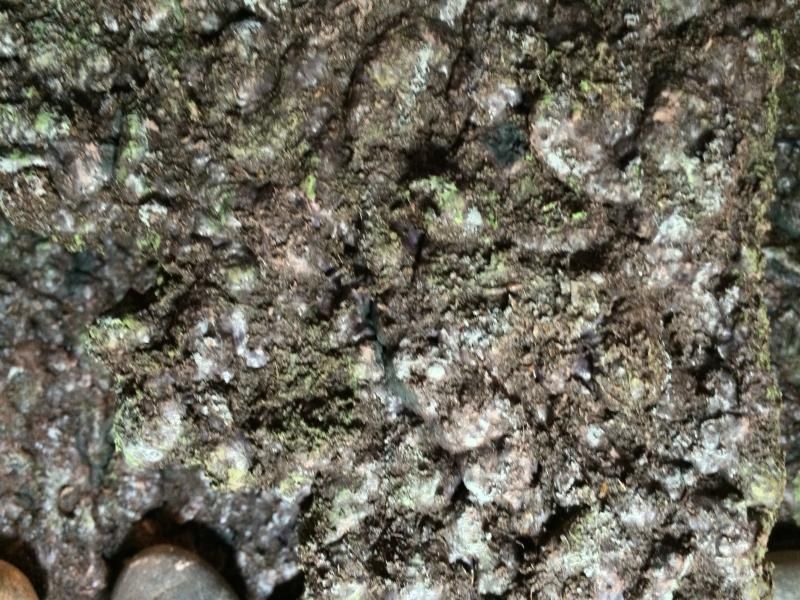
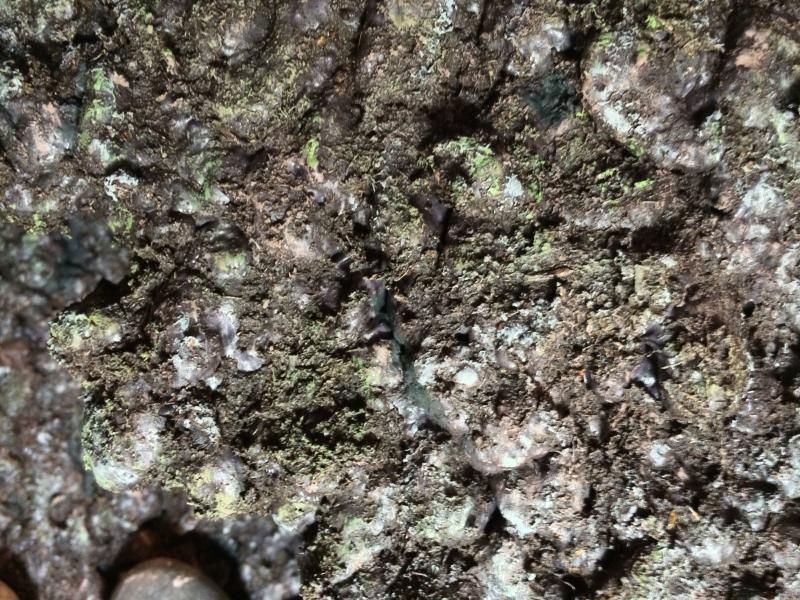
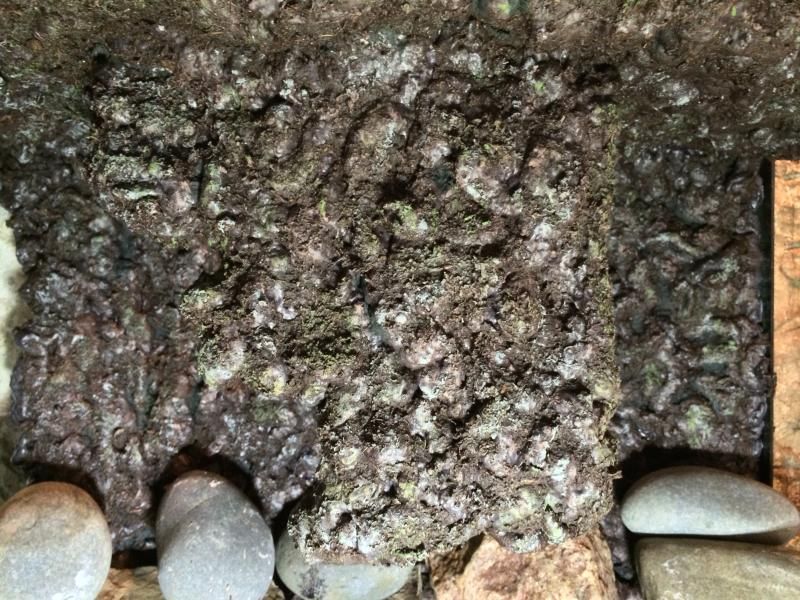
Spent time the last day or so adding color to the back ground. It is hard to tell in these pictures, but here are some shots of the back ground.
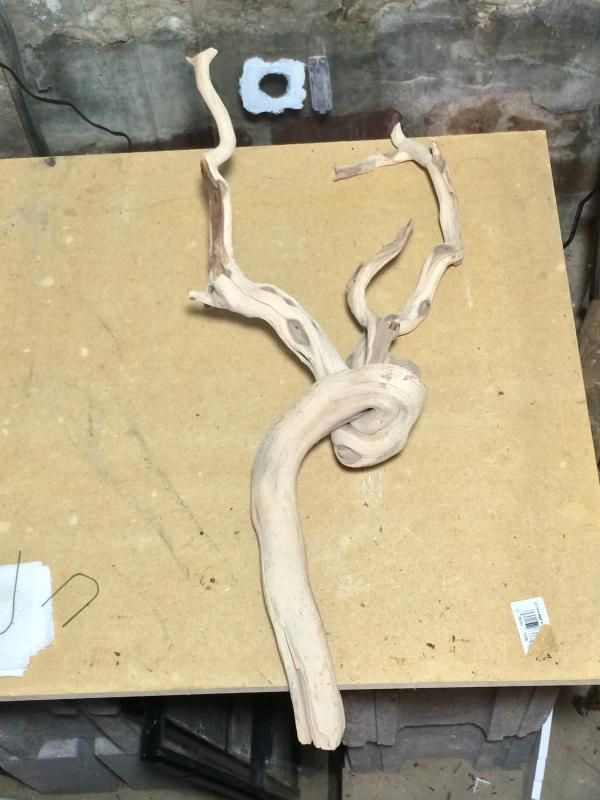
And the piece of Ghost wood that will be used in this tank?
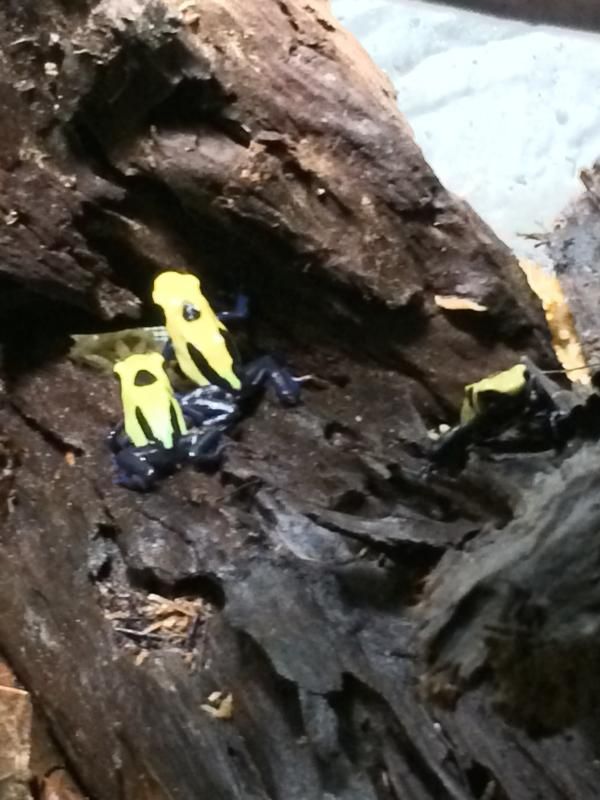
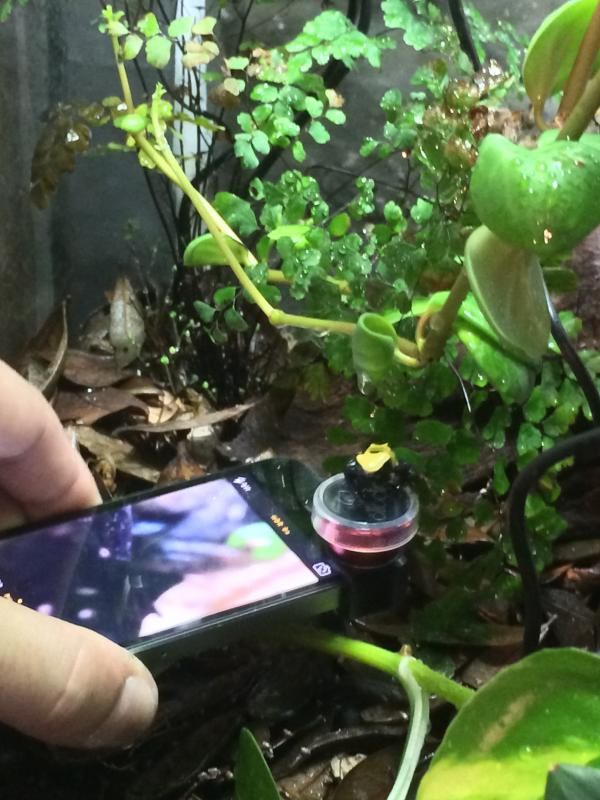
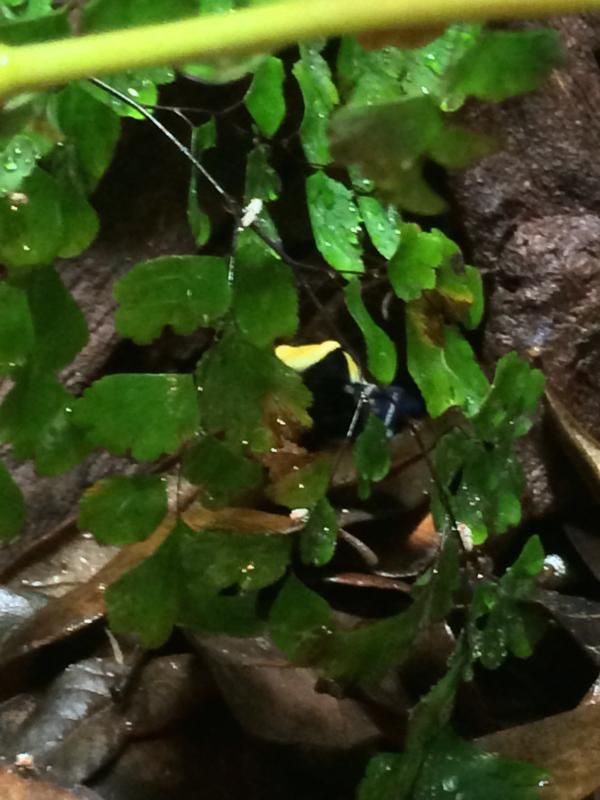
Aaaand Now for the stars of the show. I ordered 4 D. Tinctorious Citronella from Josh's frogs. They came in today. I did an unboxing video I will get edited down and put up on youtube in a bit, but for now here are some pics I grabbed of them.
One of the bold little frogs jumped onto my phone while I was snapping a few pics
1.1.0 - Oophaga Pumilio 'Blue Jeans' (2014 Nicaragua Import)
1.1.0 - Oophaga Pumilio 'Chirique Grande' F1
1.1.0 - D. Tinctorius 'Citronella'
1.2.0 - D. Tinctorius 'Azureus'
0.0.2 - D. Tinctorius 'Sipaliwini'
0.0.2 - D. Tinctorius 'New River'
0.0.4 - D. Tinctorius 'Leucomelas'
0.0.4 - Terribilis 'Mint'
1.1.0 - R. Ventrimaculatus 'French Guiana'
Facebook - https://www.facebook.com/hashtagfrogs
Youtube - https://www.youtube.com/channel/UCgC...sEZiZQoT8sOuuw
It has been encouraging to watch the Cits in the QT Tank. I put a magnetic Ledge int he tank to see how arboreal these little guys/gals are and within an hour one of them was up on top of the ledge exploring. This makes me feel a lot better about putting them in the 40B with that elevated land area.
1.1.0 - Oophaga Pumilio 'Blue Jeans' (2014 Nicaragua Import)
1.1.0 - Oophaga Pumilio 'Chirique Grande' F1
1.1.0 - D. Tinctorius 'Citronella'
1.2.0 - D. Tinctorius 'Azureus'
0.0.2 - D. Tinctorius 'Sipaliwini'
0.0.2 - D. Tinctorius 'New River'
0.0.4 - D. Tinctorius 'Leucomelas'
0.0.4 - Terribilis 'Mint'
1.1.0 - R. Ventrimaculatus 'French Guiana'
Facebook - https://www.facebook.com/hashtagfrogs
Youtube - https://www.youtube.com/channel/UCgC...sEZiZQoT8sOuuw
Uploaded a short unboxing video of the 4 Cits this morning. You can find it on my youtube channel or click this link - https://www.youtube.com/watch?v=RhPriY6dfhI
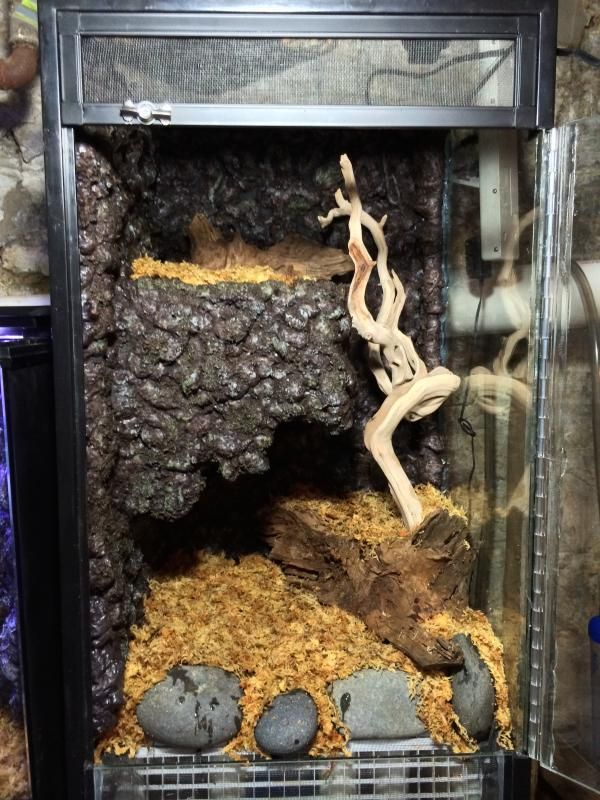
Some progress was made on the tank today. It is starting to come together. Here is the final layout for the Hardscape. The soil and Sphagnum moss has been added as well.
Part 4 video will cover the work done to get the tank to this point. Still need to get some plants together, Aquatic soil, Lights, and add the leaf liter and then we should be done!
1.1.0 - Oophaga Pumilio 'Blue Jeans' (2014 Nicaragua Import)
1.1.0 - Oophaga Pumilio 'Chirique Grande' F1
1.1.0 - D. Tinctorius 'Citronella'
1.2.0 - D. Tinctorius 'Azureus'
0.0.2 - D. Tinctorius 'Sipaliwini'
0.0.2 - D. Tinctorius 'New River'
0.0.4 - D. Tinctorius 'Leucomelas'
0.0.4 - Terribilis 'Mint'
1.1.0 - R. Ventrimaculatus 'French Guiana'
Facebook - https://www.facebook.com/hashtagfrogs
Youtube - https://www.youtube.com/channel/UCgC...sEZiZQoT8sOuuw
Part 4 is now up on youtube. It covers adding some color to a spray foam background, installing the false bottom, substrate, and the endless joys of laying out the hardscape
40B Vert - Part 4
Part 5 will be coming soon!
Thanks to everyone who has taken the time to watch these videos. I hope you enjoy watching them as much as I am making them!
1.1.0 - Oophaga Pumilio 'Blue Jeans' (2014 Nicaragua Import)
1.1.0 - Oophaga Pumilio 'Chirique Grande' F1
1.1.0 - D. Tinctorius 'Citronella'
1.2.0 - D. Tinctorius 'Azureus'
0.0.2 - D. Tinctorius 'Sipaliwini'
0.0.2 - D. Tinctorius 'New River'
0.0.4 - D. Tinctorius 'Leucomelas'
0.0.4 - Terribilis 'Mint'
1.1.0 - R. Ventrimaculatus 'French Guiana'
Facebook - https://www.facebook.com/hashtagfrogs
Youtube - https://www.youtube.com/channel/UCgC...sEZiZQoT8sOuuw
I love the pic of the frog sitting on your olloclip !
Current Collection
Dendrobates leucomelas - standard morph
Dendrobates auratus “Costa Rican Green Black"
Dendrobates auratus "Pena Blanca"
Dendrobates tinctorius “New River”
Dendrobates tinctorius "Green Sipaliwini"
Dendrobates tinctorius “Powder Blue"
Dendrobates tinctorius "French Guiana Dwarf Cobalt"
Phyllobates terribilis “Mint”
Phyllobates terribilis "Orange"
Phyllobates bicolor "Uraba"
Oophaga pumilio "Black Jeans"
Oophaga pumilio "Isla Popa"
Oophaga pumilio "Bastimentos"
Oophaga pumilio “Mimbitimbi”
Oophaga pumilio "Rio Colubre"
Oophaga pumilio "Red Frog Beach”
Oophaga pumilio "Rio Branco"
Oophaga pumilio “Valle del Rey”
Oophaga pumilio "BriBri"
Oophaga pumilio "El Dorado"
Oophaga pumilio "Cristobal"
Oophaga pumilio "Rambala"
Oophaga “Vicentei” (blue)
Oophaga sylvatica "Paru"
Oophaga sylvatica "Pata Blanca"
Oophaga histrionica “Redhead”
Oophaga histrionica "Blue"
Oophaga lehmanni "Red"
Oophaga histrionica "Tado"
Ranitomeya variabilis "Southern"
Ranitomeya imitator "Varadero"
Ranitomeya sirensis "Lower Ucayali"
Ranitomeya vanzolinii
http://www.fernsfrogs.com
https://www.facebook.com/ferns.frogs
lol yeah I loved that. Was a good reminder how bold these guys and gals will be. My other frogs (Mantella and Vents) are super shy and are rarely glimpsed. I am excited to have a species that I can sit and watch move around more lol. The Mantellas hide and the vents run. I do get to watch my wife's Reds or my sons Azureus lol.
I think I am going to really like the elevated land section. I started having concerns with it when the spray foam was curing, but with it all painted and soil in it.... I love it now. Can't wait to move the Cits in and see how much they use the top and bottom of the tank. I am going to put a Coco hut up top (as well as one down low) to try and incentivize a couple to take up residence higher in the tank
1.1.0 - Oophaga Pumilio 'Blue Jeans' (2014 Nicaragua Import)
1.1.0 - Oophaga Pumilio 'Chirique Grande' F1
1.1.0 - D. Tinctorius 'Citronella'
1.2.0 - D. Tinctorius 'Azureus'
0.0.2 - D. Tinctorius 'Sipaliwini'
0.0.2 - D. Tinctorius 'New River'
0.0.4 - D. Tinctorius 'Leucomelas'
0.0.4 - Terribilis 'Mint'
1.1.0 - R. Ventrimaculatus 'French Guiana'
Facebook - https://www.facebook.com/hashtagfrogs
Youtube - https://www.youtube.com/channel/UCgC...sEZiZQoT8sOuuw
Few more pics of the Cits. They are very fun to observe!

1.1.0 - Oophaga Pumilio 'Blue Jeans' (2014 Nicaragua Import)
1.1.0 - Oophaga Pumilio 'Chirique Grande' F1
1.1.0 - D. Tinctorius 'Citronella'
1.2.0 - D. Tinctorius 'Azureus'
0.0.2 - D. Tinctorius 'Sipaliwini'
0.0.2 - D. Tinctorius 'New River'
0.0.4 - D. Tinctorius 'Leucomelas'
0.0.4 - Terribilis 'Mint'
1.1.0 - R. Ventrimaculatus 'French Guiana'
Facebook - https://www.facebook.com/hashtagfrogs
Youtube - https://www.youtube.com/channel/UCgC...sEZiZQoT8sOuuw
Have spent the last 4 - 6 days plant shopping and truing to figure out what I want to do with this tank. Ferns are a given and I will be taking some clippings from other tanks and putting them in here, but I want to add some color to the tank. I am seriously looking at Begonias... I have had very poor luck keeping them alive in vivariums in the past, but I suspect it was the poor drainage those tanks had versus the drainage setup I am doing now.
Been rummaging through Steves Leave and it seems nearly every plant I like they are out of stock... Grrr Hoping to do a plant order by tomorrow.
1.1.0 - Oophaga Pumilio 'Blue Jeans' (2014 Nicaragua Import)
1.1.0 - Oophaga Pumilio 'Chirique Grande' F1
1.1.0 - D. Tinctorius 'Citronella'
1.2.0 - D. Tinctorius 'Azureus'
0.0.2 - D. Tinctorius 'Sipaliwini'
0.0.2 - D. Tinctorius 'New River'
0.0.4 - D. Tinctorius 'Leucomelas'
0.0.4 - Terribilis 'Mint'
1.1.0 - R. Ventrimaculatus 'French Guiana'
Facebook - https://www.facebook.com/hashtagfrogs
Youtube - https://www.youtube.com/channel/UCgC...sEZiZQoT8sOuuw
Decent drainage and begonias can be easy. I would give it another shot.
2.0.3 Hyla versicolor "Eastern Gray Tree Frogs"
2.2.0 Agalychnis callidryas "Red Eyed Tree Frogs"
0.0.3 Dendrobates auratus "Turquoise and Bronze"
0.0.1 Anaxyrus fowleri "Fowler's Toad"

OMG Paul; this is definite crazy behaviorOriginally Posted by DigitalPunk

.
Remember to take care of the enclosure and it will take care of your frog!
Rotf!! I wonder if there's a cure for it?!?!
Education is the most powerful weapon we can use to change the world ~ Nelson Mandela
1.0.0 Oophaga Pumilio 'Black Jeans'
0.0.10 Phyllobates Vittatus
0.0.3 Phyllobates Terribilis 'Mint'
0.0.3 Dendrobates Tinctorius 'Patricia'
0.0.5 Dendrobates Leucomelas
0.0.2 Dendrobates Tinctorius 'Powder Blue'
0.0.2 Ranitomeya Variabilis 'southern'
0.0.3 Epipedobates Anthonyi 'zarayunga'
1.2.0 Phyllobates bicolor
0.0.3 Dendrobates tinctorius 'azureus'
0.0.1 Avicularia Avicularia
0.0.1 Gramastola porteri
0.2.0 Canines
1.0.0 Tabby/Maine Coon Mix
2.1.0 Genetics Experiments
0.1.0 Bed Bully
The cure as far as I can tell is MORE TANKS!!!!
1.1.0 - Oophaga Pumilio 'Blue Jeans' (2014 Nicaragua Import)
1.1.0 - Oophaga Pumilio 'Chirique Grande' F1
1.1.0 - D. Tinctorius 'Citronella'
1.2.0 - D. Tinctorius 'Azureus'
0.0.2 - D. Tinctorius 'Sipaliwini'
0.0.2 - D. Tinctorius 'New River'
0.0.4 - D. Tinctorius 'Leucomelas'
0.0.4 - Terribilis 'Mint'
1.1.0 - R. Ventrimaculatus 'French Guiana'
Facebook - https://www.facebook.com/hashtagfrogs
Youtube - https://www.youtube.com/channel/UCgC...sEZiZQoT8sOuuw
There are currently 1 users browsing this thread. (0 members and 1 guests)
 Posting Permissions


 Reply With Quote