
Well I've been reading tons of great stuff on this siteand decided to join! Special thanks to Bill "derangedchipmunk"! Inspiring stuff!
So, I have a green tree frog and Im lazy (really just too busy with all kindsof other stuff) and wanted to build a vivarium for less maintenance. So my little guy Kelsio (American Green Tree Frog named by my, atthe time, three year old boy) is staying in a little cheap 10 gallon tank witheco earth and a cool little petco tree and water bowl. I put in a Do It Yourself fogger already there.
But now after an Achilles tear recovery, Im on to the realbuild! So here are my plans/thoughts and wanted to see if someone can helpanswer a few questions and maybe put me on the right path.
What I have:
24x18x24 exo terra terrarium with background
Silicone, GS, gloves etc
Leca balls (hydroton), landscape fabric, NEHERP mix (wclay added), NZ sphagnum moss, leafs (from magnolia tree outside)
LEDs (homemade from a led site, just for cool colors), Twoexo terra lamps (one 60w normal light one exo black night light)
Eco earth, small pieces of cork bark, some cooldriftwood, net pots (2 and 3), exo vines
Dehumidifier (modified to fit my tubing) for fogger ofcourse J
What Ive donethus far:
Water tested my waterfall. Im using a piece of driftwood that fitsperfect on the right side. Plan onhaving a shallow water spot in front right side. Drilled a hole ¾ the way up and tube runs inthe backside. Plan on siliconing thetube and applying eco earth later. Waterruns right where I want, for now at least.
Soaked all cork bark and drift wood in bleach water (nottoo much bleach) for a day. Soaked itfresh water one day. Rinsed. Its drying as I type. Plan on putting it in BBQ pit at 250-300 degto dry it out after it dries more.
I installed the three LED strip directly across the top ofexo background and fed wire out the back side wire routing conduit thingy. To prevent the lights shining at me, im goingto install a little sheet metal strip bent over and reflecting down. Then silicon and eco the top side to hide it.
Concerns/questions:
I hope I didnt screw up with the bleach. Hoping that the pit will get it all out. Please tell me im okay!
My driftwood piece that fits perfect is VERY soft andalmost rotty. I thought about sprayingit with urethane or krylon fusion clear to make it so it doesnt rot more ormold or whatever other bad things can come. But I really like it and I also have a HUGE hard peice that is awesome,in case it doesnt work out. Think thatokay. Oh, i planned on boiling too sincei read something about tannins, etc. Itwill be submersed a little bit.
The plans (incase your still reading):
The fogger will be in cabinet under tank. The tube willjust go into top (hole cut in screen) run through a hole perfectly placed byGod in the driftwood, and it will fog from out of the branched out bottom ofthe wood water fall, right on top the water. I will coat and eco the tube to look like vine, and then add my exoterra vines to the mix there too.
The background: Iplan on using the one with tank. Then securingthe net pots, cork bark to it and then great stuff here and there. After that, silicone the whole thing and putthe eco earth all over. After its alldone on my table, i will place it in tank and silicone the back at a few smallspots so it stays there. I thought ofthis for a few reasons: #1. Its seemseasier to work this way. #2 if i screwup and dont like it, i toss it and do it like everyone else on the back glasswith foam etc. #3 my pump wire runs rightback there easily hidden.
The floor: Usualstuff with material mentioned above. Except,i plan on getting eggcrate to make a deep side on the left. It will be blocked off completely. So nothing gets in. Nehrp mix on top and crate with mesh aroundsides. Going to have a hatch to put fishin. Reason for this is i read tree frogsdont like deep water and can drown. So theopen side will be about 1.5 in and the deep side about 4-5 in maybe. (Dang...i should have ran an led downthere...I have one left though!) done!
That prettymuch it for now...but here are some questions that have been lingering aroundmy head (for future stuff):
Doodle bugs. Ihave tons of these outside. Do thesecount as the isopods ive been reading about??
Will fish live in water that is tap treated with thatblue stuff?
Is there a cool little way i can arrange to get water outfor cleans? Without buying over $50 worth of stuff.
To mist or to auto mist (my laziness kicking in). The concerns i have are water overflow orwater loss. If i run a rain or misttubing using the tank water, will the water level in my swallow pond get toolow? And can plants even take that bluetap water? Then if i get a 5 gallonbucket under tank in cabinet. Will thewater get too high? Im thinking, justspray it by hand every once in a while.
If you made this far..THANKS FOR READING and PLEASE replywhen you can with any suggestions or tips! Or OMG dont do thats! Ill post pics and updates soon!
Ok, before I reread this, I gotta wrap my head around a few things here:
A) what in the world, is a doodlebug?
And B) when you say blue tap water, do you mean you actually have blue tap water? Like, you hold a glass of water to the light and it's blue? Because, I gotta be honest, I got nothing for blue water, man. Soft water, hard water, heck, even salt water, but blue water? I, ah, got nuttin
Education is the most powerful weapon we can use to change the world ~ Nelson Mandela
1.0.0 Oophaga Pumilio 'Black Jeans'
0.0.10 Phyllobates Vittatus
0.0.3 Phyllobates Terribilis 'Mint'
0.0.3 Dendrobates Tinctorius 'Patricia'
0.0.5 Dendrobates Leucomelas
0.0.2 Dendrobates Tinctorius 'Powder Blue'
0.0.2 Ranitomeya Variabilis 'southern'
0.0.3 Epipedobates Anthonyi 'zarayunga'
1.2.0 Phyllobates bicolor
0.0.3 Dendrobates tinctorius 'azureus'
0.0.1 Avicularia Avicularia
0.0.1 Gramastola porteri
0.2.0 Canines
1.0.0 Tabby/Maine Coon Mix
2.1.0 Genetics Experiments
0.1.0 Bed Bully
I managed to read it all lol. Welcome!!!
Looks like you are headed on the right path for your build. I have a couple of questions to make sure we are talking about the same thing and some other... here I will just run down a list of thoughts, answers, and concerns.
1. Drift wood - Where did you get it, what type of wood is it?
2. Soaking in bleach is not needed when treating wood. You just bake it in the oven at 250 for an hour or so. You may want to soak in fresh water, bake it dry and then soak again to make sure you get all the bleach out of the wood.. repeat as many times as you think you need
3. LED lights inside the tank could be bad. You are introducing something that is not 100% waterproof into an environment you will be spraying water in. Better to keep the lights outside the tank
4. Sheet Metal in the tank - Sheet metal is super sharp. Plans on keeping your frog from getting hurt on it?
5. Building the background outside the tank - This is tricky, you will want to continuously test fit your background back in the tank to make sure it is fitting right and looking the way you want it to.
6. Blue water - The water need to be treated to remove Chlorine and Chloramines. Fish will be fine in treated tap water. In fact the stuff we use to treat tap water for frogs is the same thing used to treat aquarium water.
7. Leafs from yard - Unless you are 100% certain your area is pesticide free I would steer clear of using field collected leaf liter. It is super cheap to buy online from NeHerp, Josh's Frogs, Black Jungle, or Genesis Exotics that risking collecting your own leafs just doesn't make sense.
8. Isopods from the yard - I would not add any insects to my tanks that were collected from outside. You have no idea what they were exposed to or have eatin. Best to buy from a hobby supplier.
9. Water level - Siphon out excess water as needed (with a fish in the water you should probaly do 50% water changes every week anyways)
10. Water section. I am not understanding how you will have a shallow water pool on one side of the tank and a deep one on the other.... unless I am missing something. The water line in your tank will be constant on all areas of the tank...
11. Misting - Start out hand misting until you get a feel for how often you need to mist to keep the humidity up. Then invest in an auto mister (mistking is the best). Don't over water. There is a difference between watering plants and misting a tank to boost humidity.
Thats all for nowHope it helps you some.
1.1.0 - Oophaga Pumilio 'Blue Jeans' (2014 Nicaragua Import)
1.1.0 - Oophaga Pumilio 'Chirique Grande' F1
1.1.0 - D. Tinctorius 'Citronella'
1.2.0 - D. Tinctorius 'Azureus'
0.0.2 - D. Tinctorius 'Sipaliwini'
0.0.2 - D. Tinctorius 'New River'
0.0.4 - D. Tinctorius 'Leucomelas'
0.0.4 - Terribilis 'Mint'
1.1.0 - R. Ventrimaculatus 'French Guiana'
Facebook - https://www.facebook.com/hashtagfrogs
Youtube - https://www.youtube.com/channel/UCgC...sEZiZQoT8sOuuw
Chipmunk: A doodle bug is what us southerners call a pill bug aka rolly polly aka...w hre yag:
the pill bug (a crustacean, not an insect- Order: Isopoda). Its various species are found all over the world. English slang names include: roly poly (spelled many ways), doodlebug, woodlouse, woodbug, armadillo bug, ball bug, bowling ball bug, hardy back, potato bug, slater, chuggy pig, butcher boy, carpenter, cheesybug, cheeselog, daddy gamfer (also spelled daddy gampfer), beetle bug, and Granny Grey. The most common slang names in America are roly poly and doodlebug.
Blue water....I do not have blue water...lol! I use tap water. and add zoo med repti safe. its blue...sorry bout that!
- Drift wood - Where did you get it, what type of wood is it?
My aunt gave it to me…no clue. I cantake a pic or video tonight and post it.
2. Soaking in bleach is not needed when treating wood. You just bake it in theoven at 250 for an hour or so. You may want to soak in fresh water, bake it dryand then soak again to make sure you get all the bleach out of the wood..repeat as many times as you think you need
Will do! Thanks!
3. LED lights inside the tank could be bad. You are introducing something thatis not 100% waterproof into an environment you will be spraying water in.Better to keep the lights outside the tank
They are rated Waterproof IP67…
https://www.superbrightleds.com/moreinfo/led-strips-and-bars/high-power-rgb-led-sign-module--lsm-rgb3x3/1779/4253/
4. Sheet Metal in the tank - Sheet metal is super sharp. Plans on keeping yourfrog from getting hurt on it?
Well I was actually thinking sheet metal for its reflectance properties…but I was also thinking of cardboard with foil on the bottom. Etiher way I would dull edge, cause I don’t tocut the frog or me for that matter. And alsocoat it in silicone and eco earth on the top and edge.
5. Building the background outside the tank - This is tricky, you will want tocontinuously test fit your background back in the tank to make sure it isfitting right and looking the way you want it to.
Well it came with the terrarium and fits like a glove…so should be goodthere.
6. Blue water - The water need to be treated to remove Chlorine andChloramines. Fish will be fine in treated tap water. In fact the stuff we useto treat tap water for frogs is the same thing used to treat aquarium water.
Awesome news! Thanks! And the “blue” stuff is repti safe by zoomed.
7. Leafs from yard - Unless you are 100% certain your area is pesticide free Iwould steer clear of using field collected leaf liter. It is super cheap to buyonline from NeHerp, Josh's Frogs, Black Jungle, or Genesis Exotics that riskingcollecting your own leafs just doesn't make sense.
Well I have a ton of them and I was going to do the rinse and bake thing…thatnot good enough? I might have “pests” but I cant even remember the last time I sprayedanything out there in my front yard.
8. Isopods from the yard - I would not add any insects to my tanks that werecollected from outside. You have no idea what they were exposed to or haveeatin. Best to buy from a hobby supplier.
10-4!
9. Water level - Siphon out excess water as needed (with a fish in the wateryou should probaly do 50% water changes every week anyways)
Cool!
10. Water section. I am not understanding how you will have a shallow waterpool on one side of the tank and a deep one on the other.... unless I am missingsomething. The water line in your tank will be constant on all areas of thetank...
So, on the left side I will build, out of egg grate, to create a falsebottom there. Lets just say the frontleft quadrant for now. So there will beno leca balls there. Then on top of thatquadrant, I will put the substrate mix etc. The sides of the quadrant will also be “blocked off” as I will use thecrate around the sides too. All crateswill be covered with mesh fabric. On theoutside of the walls, then there will be the lace. In the front right, the pond side, the lecaballs will be filled in as needed to get a shallow pond. I will also have a hatch in the top of theleft front quadrant so I can get fish in and dead ones out. Make sense?
11. Misting - Start out hand misting until you get a feel for how often youneed to mist to keep the humidity up. Then invest in an auto mister (mistkingis the best). Don't over water. There is a difference between watering plantsand misting a tank to boost humidity.
Ok, I think by hand will be easiest fornow!
Thats all for nowHope it helps you some.
Yes! Thanks for reading and thankshelping!
Well I have been trying to upload images for the past 30 minutes. iphone...failed. now on my PC, failed. either its too big, or when I reduce it its invalid. saved as all types of image files, no luck. any advice?
Opens an account on photobucket (free), uoad your images there, edit (if needed), then copy the IMG link to the body of your post.
Education is the most powerful weapon we can use to change the world ~ Nelson Mandela
1.0.0 Oophaga Pumilio 'Black Jeans'
0.0.10 Phyllobates Vittatus
0.0.3 Phyllobates Terribilis 'Mint'
0.0.3 Dendrobates Tinctorius 'Patricia'
0.0.5 Dendrobates Leucomelas
0.0.2 Dendrobates Tinctorius 'Powder Blue'
0.0.2 Ranitomeya Variabilis 'southern'
0.0.3 Epipedobates Anthonyi 'zarayunga'
1.2.0 Phyllobates bicolor
0.0.3 Dendrobates tinctorius 'azureus'
0.0.1 Avicularia Avicularia
0.0.1 Gramastola porteri
0.2.0 Canines
1.0.0 Tabby/Maine Coon Mix
2.1.0 Genetics Experiments
0.1.0 Bed Bully
Let me try. So I siliconed my net pots and cork bark pieces to the exo terra foam background.
i was going to just great stuff around it all to keep sturdy but was nervous it all night fall off. So I dipped toothpicks in silicone and stuck them in the foam then clipped them to size.
then I foamed all around the bark.
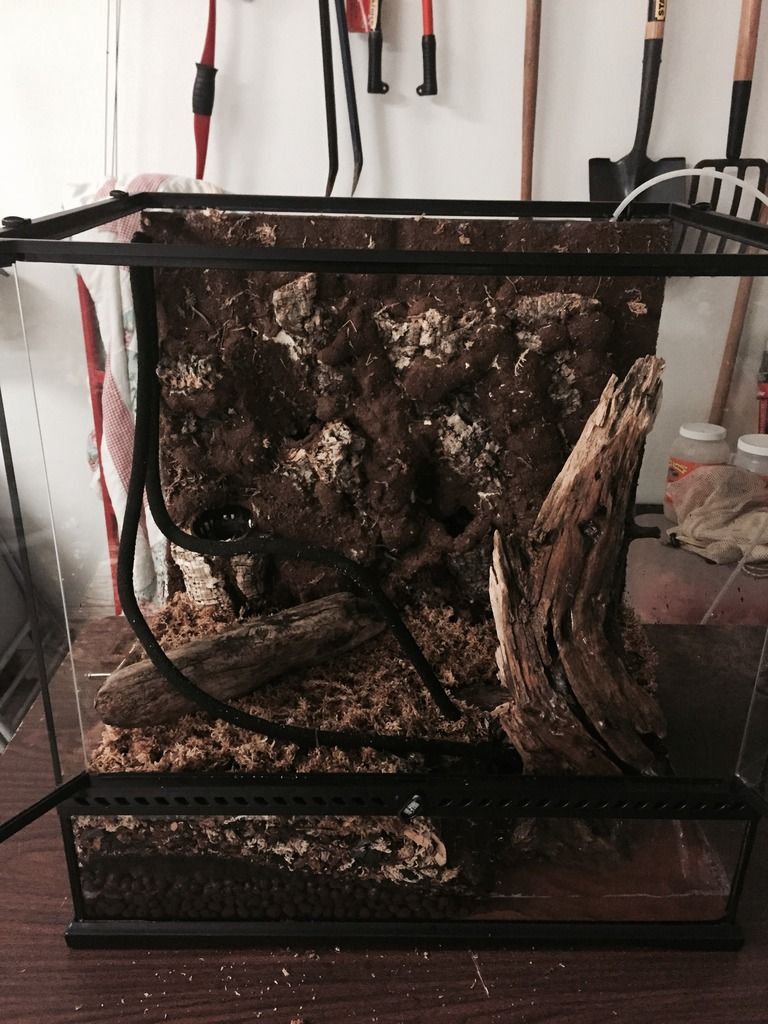
here is my water fall driftwood. Drilled a hole in back. Pump will be in right back corner. Tube will be inside wood. Tested and looked perfect.
This is what I wanted to use. But it's huge! But awesome.
i have Eco earth and was going to get some Pete moss from lowes to mix in before I silicon all the foam and background. Not really looking forward to this part.
Looking good so far. Covering the foam is easy
I bought a pair of rubber gloved (disk washing gloves) that I use when covering backgrounds. It lets me push the silicon deep into all the cracks without getting it all over my hands. I switch to these gloves over latex because I got tired of using 3-4 pairs of gloves per tank. With these when I am done I use some paper towels to wipe of the excess silicon and they are ready for the next use.
a few tips with silicon covering I will add is that the thicker the coat the better. You want to be able to push your covering material into the silicon. Thin spots of silicon tend to be the sections that don't cover well. Do the covering in sections. Apply some silicon then cover it, apply more silicon and cover it. This keeps the silicon form curing to a point where ti doesn't hold the covering material as good.
Thin spots can either be fixed by applying silicon so it overhangs the thin are. This will give the 2nd layer of silicon something to bite onto (silicon does not stick to cured silicon). I tend to just cover thin spots with some moss or a plant is possible.
Always remember you will always see the flaws in your tank but others rarely do. I have stopped pointing out the flaws in my tanks to others and 99% of them go unnoticed.
1.1.0 - Oophaga Pumilio 'Blue Jeans' (2014 Nicaragua Import)
1.1.0 - Oophaga Pumilio 'Chirique Grande' F1
1.1.0 - D. Tinctorius 'Citronella'
1.2.0 - D. Tinctorius 'Azureus'
0.0.2 - D. Tinctorius 'Sipaliwini'
0.0.2 - D. Tinctorius 'New River'
0.0.4 - D. Tinctorius 'Leucomelas'
0.0.4 - Terribilis 'Mint'
1.1.0 - R. Ventrimaculatus 'French Guiana'
Facebook - https://www.facebook.com/hashtagfrogs
Youtube - https://www.youtube.com/channel/UCgC...sEZiZQoT8sOuuw


![[United States]](images/flags/United States.gif "United States")
Have to agree with Paul, I'm the only one who usually sees the flaws in my backgrounds. Plus plants usually grow over them in time anyway.
Originally Posted by DigitalPunk

Thanks Paul! Im just nervous because there seems to be a lot to cover and like you mentioned, i dont want to have it cure before i cover it up. I like your idea of caulk then cover, then repeat, but im nervous with that way too, cause i see myself caulking, them covering then missing spots that look covered, but dont have silicone under the eco stuff. My other big concern is that i get a lot of caulk on the cork bark. i cant wait to get this done...but not looking forward to doing it.
One question i have is that i have tons of eco earth, but i dont think i have enough soaked and dried. so instead of doing that from the brick again, i was giong to go get some peat moss from lowes. should i use 100% eco earth coco, or mix in some peat. i also saw exp terra has some more brick stuff called forest moss. seems ok to mix that in the coco stuff....any thoughts?
lowes stuff:
Shop Fafard 3-cu ft Organic Peat Moss at Lowes.com
exo stuff:
Amazon.com : Exo Terra Forest Plume Moss, 7 Quarts, 2-Pack : Pet Terrariums : Pet Supplies
I went to lowes and bought this:
Shop Mosser Lee 0.14-cu ft Spanish Moss at Lowe's
going to try to mix it in the coco and see how it looks.
Mixed the Eco earth and moss. Looks okay I think. Siliconed in two stages and sprinkled it on. Did one touch up and it can out pretty good.
Watered down my leca balls
Ran my pump cord and a drain tube. That a clamp at the top to hold it flush. I put in leca balls to hold bottom in place and then siliconed the top to hold the background in.
Thought about making some sort of jar to put pump in. But it was too much of a hassle. So I just put a dollar store lent trap mesh with a sponge for filter. Also put a little sponge on end of drain tube.
Siliconed my pump and fog tubes then used the Eco earth to coat.
And here is what she looks like tonight. Put the drain layer. And the sand where the pond will be. That driftwood has a hole for the pump tune and the water runs down it really nice.
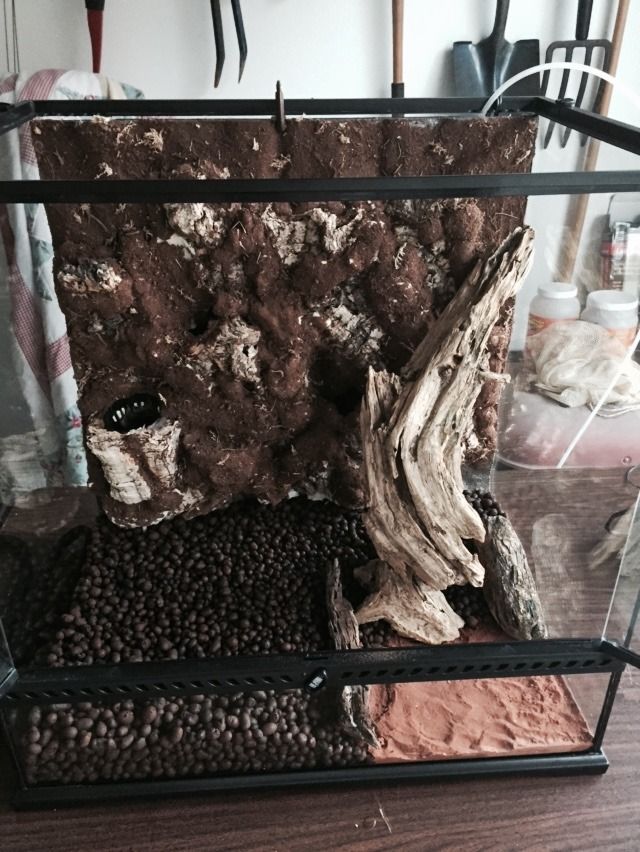
Quick pic update. Added screen, substrate, and spaghnum moss. And have the waterfall going with the wood and vines and stuff.
any plants suggestions???
Bill is the plant guru so I will leave that to him. Looking good.
1.1.0 - Oophaga Pumilio 'Blue Jeans' (2014 Nicaragua Import)
1.1.0 - Oophaga Pumilio 'Chirique Grande' F1
1.1.0 - D. Tinctorius 'Citronella'
1.2.0 - D. Tinctorius 'Azureus'
0.0.2 - D. Tinctorius 'Sipaliwini'
0.0.2 - D. Tinctorius 'New River'
0.0.4 - D. Tinctorius 'Leucomelas'
0.0.4 - Terribilis 'Mint'
1.1.0 - R. Ventrimaculatus 'French Guiana'
Facebook - https://www.facebook.com/hashtagfrogs
Youtube - https://www.youtube.com/channel/UCgC...sEZiZQoT8sOuuw
All done... Sort of. Still need to go to lowes for a connector for fog. And then build some light thing for my LEDs to mount on top. Now I wait..... Wish I could just throw the frog in there now.
oh and good/bad news. My siphon tube is still siphoning. So no need to suck on it and get frog water in my mouth. Bad news is I had to rig a plug to make it stop. Going to look for a valve that fits too at lowes tomorrow.
Couple videos.
http://youtu.be/saj9Cf_-4bg
http://youtu.be/YotFdhBfht8
good job. looks really nice! are you having a problem with the water splashing off the wood towards the door? looks like you had water all over the place
Not a bit. That pic was taken right after I processed and planted. So it was in the garage and messy. The water flow is perfect. Thanks!!!! I have the fog now so when I get a chance, I will post another video. Got the leds in too.
There are currently 1 users browsing this thread. (0 members and 1 guests)
 Posting Permissions


 Reply With Quote


