
TRADITIONAL DRAINAGE LAYER:
A drainage layer should not be confused with the False Bottom. Both provide essentially the same function, but use very different methods. A Drainage Layer is used to allow excess water to drain off the soil primarily.
<I borrowed a picture from John's Drat Frog thread to use in the illustration of this section. Graphics added to help with description> Thanks John! I hope it was ok I used your picture.
The Drainage Layer:
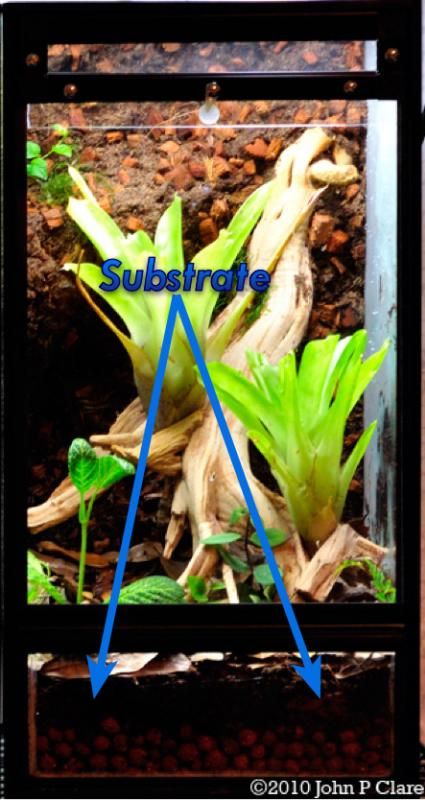
The drainage layer is a crucial part of any terrarium, vivarium, and paludarium. It provides a space for any excess water to collect, keeps the substrate from becoming swamped in water, aides in maintaining the humidity in the enclosure, and helps to sustain a healthy microfauna population.
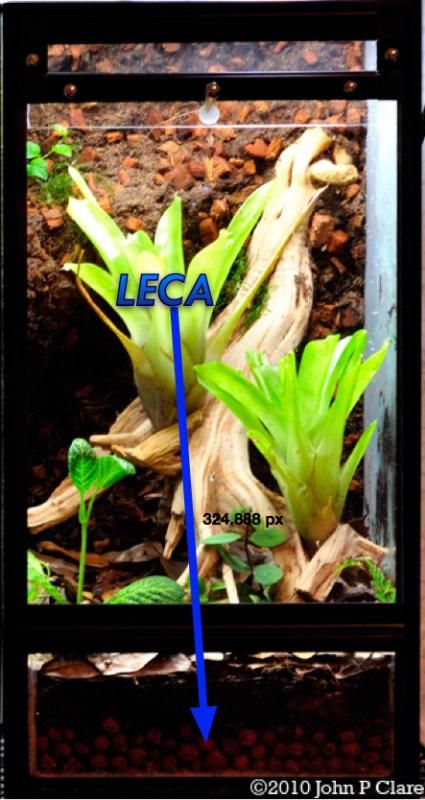
The media used in the drainage layer can consist of leca, hydro balls, bio drain, or rocks (several online hobby suppliers have developed their own drainage material as well). The down side to rocks is the increase in overall weight of the tank. Regardless of the material used you will want it to be 2.5-3 inches deep (6-8cm).
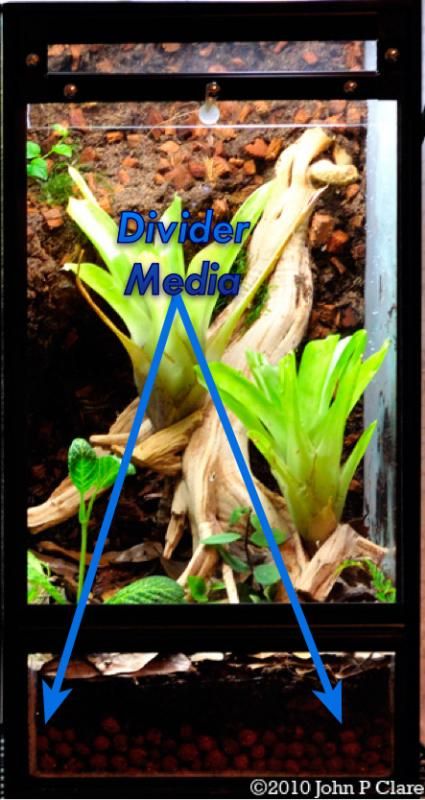
Above the drainage layer, but below the soil you will need to use something to keep the soil from falling into the drainage layer. You can use common weed block material or a fine screen mesh (fiberglass window screen works great). Basically anything that is non toxic and will allow air and water to pass through. <referred to as Divider Media in the below Pic)
Once the substrate layer is complete ( substrate will be covered in a later section) it is time to add water. We add water now for multiple reasons one is to saturate the substrate with water, and the other is adding water through the substrate prevents the water from shifting the media in your drainage layer. You want to fill the drainage layer to within 1/4 to 1/2 of the total depth of the drainage layer. Never allow the water level to reach the substrate. This will swamp out your soil and conversely should not be allowed to dry out completely (this would negatively impact the humidity of the environment).
So how do you get the excess water out? I am glad you asked! You will need to plan ahead for this. It can be handled in many ways, I will only cover a few of the more popular methods here.
1. Install a piece of PVC pipe that is hidden in the background and extends down through the substrate, drainage barrier, and into the drainage layer. Later you can insert a tube into the PVC pipe to siphon excess water out.
2. Drill a hole in the tank and install a bulkhead drain. This is riskier and should only be done once you practiced a bit. You will want to get a high quality diamond tipped bit to cut the glass. Once your hole is drilled you can install the bulkhead and drain excess water out that way.
3. Similar to the first method, you can install a pipe that ends at the substrate. You then cap it with something to prevent the inhabitants from spelunking into the drainage layer but can be open and used by you to remove water.
4. Install a small pump in the drainage layer and route a tube up the tank and out the top (this can be hidden in the background as well)
As you can see there are many many options for evacuating excess water from the tank. The hardest part is picking the one you want to use
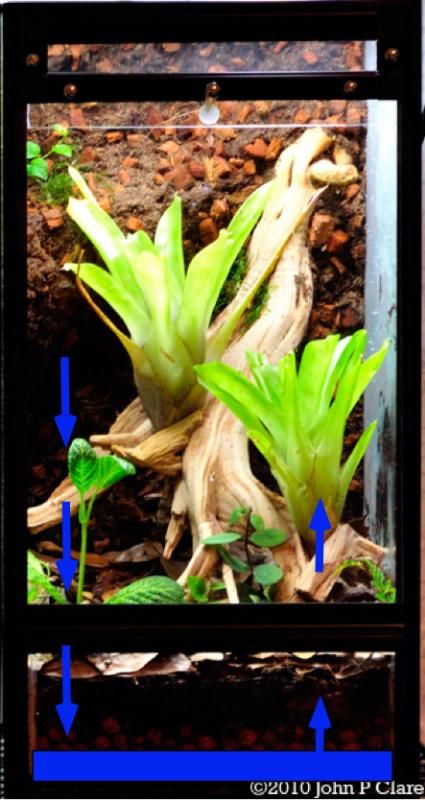
Below is a pic to illustrate how the drainage layer functions:
Water that is sprayed in the tank to maintain humidity will work its way down through the substrate and into the drainage layer. Over time that water will begin to evaporate and pass back through the substrate and help increase the overall humidity of the enclosure. Micro fauna will also pass through the Divider Media to get closer to the standing water. They will breed there and then return to the substrate to help keep the tank clean. All you need to do is keep an eye on the water level and remove any excess water from the drainage layer as needed to keep around 1 inch of space between the water and the Barrier Media.
in a nutshell that is the Drainage Layer.
Last edited by DigitalPunk; October 23rd, 2014 at 08:15 PM.
1.1.0 - Oophaga Pumilio 'Blue Jeans' (2014 Nicaragua Import)
1.1.0 - Oophaga Pumilio 'Chirique Grande' F1
1.1.0 - D. Tinctorius 'Citronella'
1.2.0 - D. Tinctorius 'Azureus'
0.0.2 - D. Tinctorius 'Sipaliwini'
0.0.2 - D. Tinctorius 'New River'
0.0.4 - D. Tinctorius 'Leucomelas'
0.0.4 - Terribilis 'Mint'
1.1.0 - R. Ventrimaculatus 'French Guiana'
Facebook - https://www.facebook.com/hashtagfrogs
Youtube - https://www.youtube.com/channel/UCgC...sEZiZQoT8sOuuw
There are currently 1 users browsing this thread. (0 members and 1 guests)
 Posting Permissions


![[United States]](images/flags/United States.gif "United States")


 Reply With Quote